Solana Quick Start Guide
Welcome to the Solana Quick Start Guide! This hands-on guide will introduce you to the core concepts for building on Solana, regardless of your prior experience. By the end of this tutorial, you'll have a basic foundation in Solana development and be ready to explore more advanced topics.
What You'll Learn #
In this tutorial, you'll learn about:
- Understanding Accounts: Explore how data is stored on the Solana network.
- Sending Transactions: Learn to interact with the Solana network by sending transactions.
- Building and Deploying Programs: Create your first Solana program and deploy it to the network.
- Program Derived Addresses (PDAs): Learn how to use PDAs to create deterministic addresses for accounts.
- Cross-Program Invocations (CPIs): Learn how to make your programs interact with other programs on Solana.
The best part? You don't need to install anything! We'll be using Solana Playground, a browser-based development environment, for all our examples. This means you can follow along, copy and paste code, and see results immediately, all from your web browser. Basic programming knowledge is helpful but not required.
Let's dive in and start building on Solana!
Solana Playground #
Solana Playground (Solpg) is a browser-based development environment that allows you to quickly develop, deploy, and test Solana programs!
Open a new tab in your web browser and navigate to https://beta.solpg.io/.
Create Playground Wallet #
If you're new to Solana Playground, the first step is to create your Playground Wallet. This wallet will allow you to interact with the Solana network right from your browser.
Step 1. Connect to Playground #
Click the "Not connected" button at the bottom left of the screen.
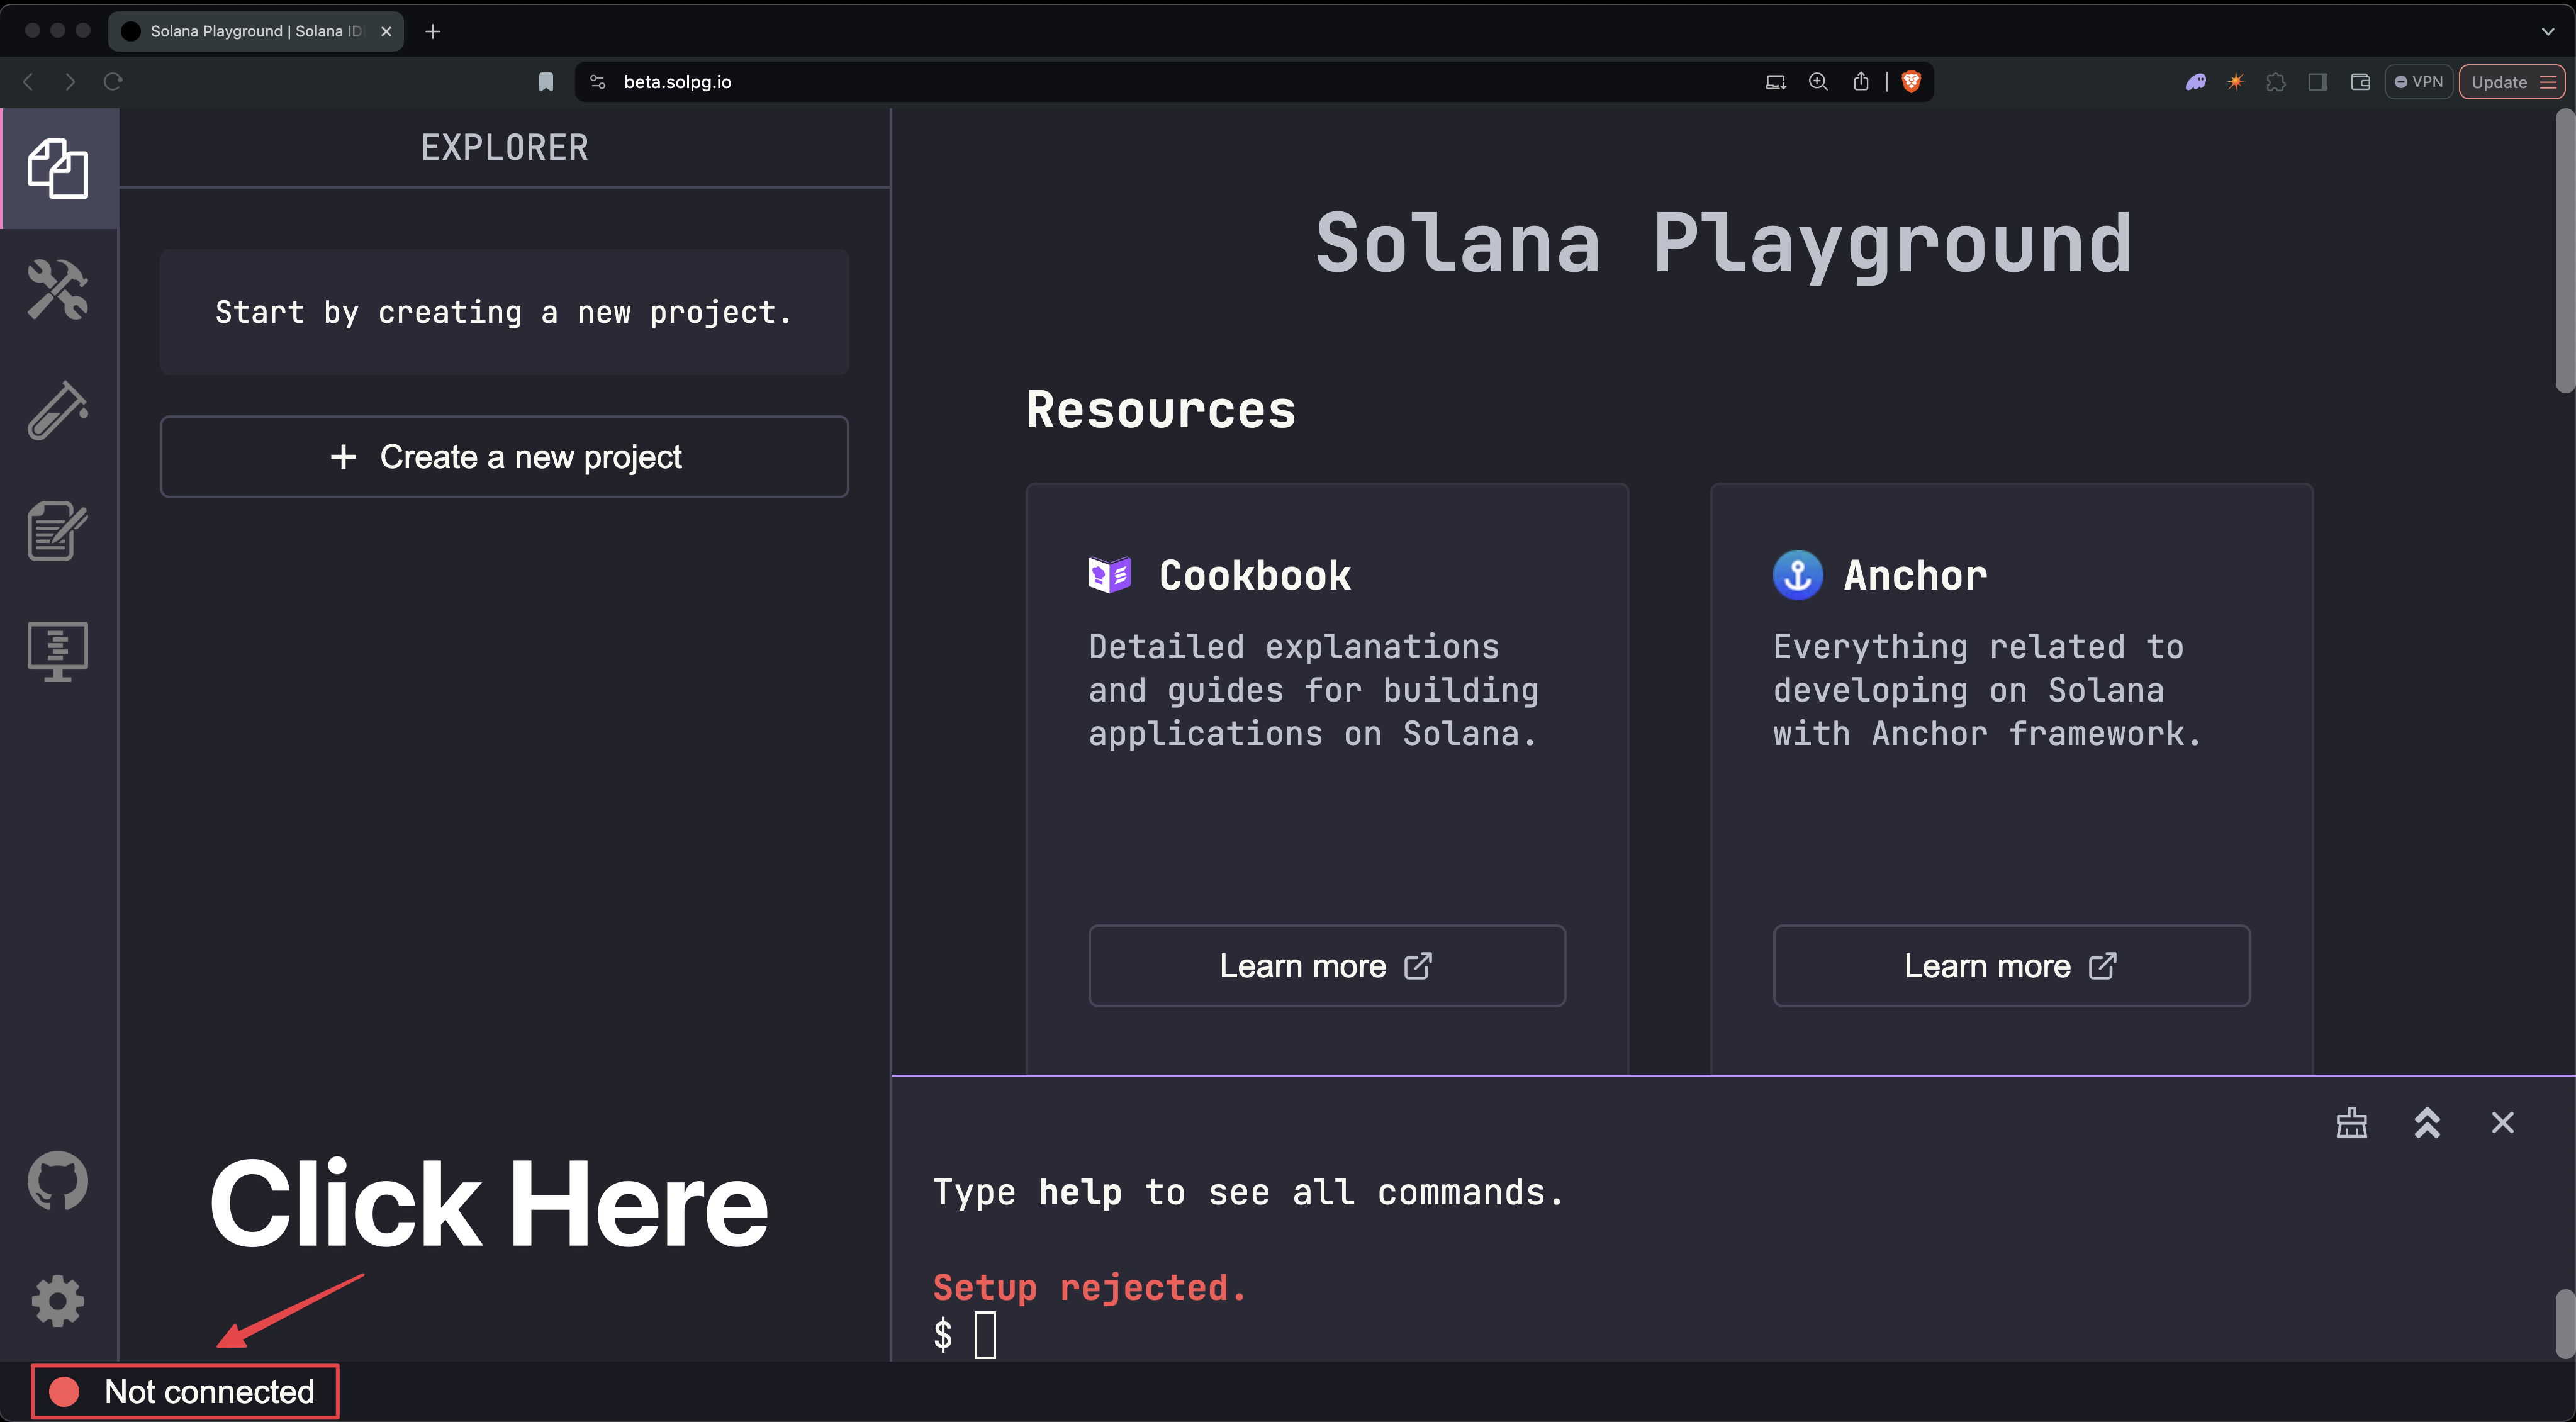 Not Connected
Step 2. Create Your Wallet #
You'll see an option to save your wallet's keypair. Optionally, save your wallet's keypair for backup and then click "Continue".
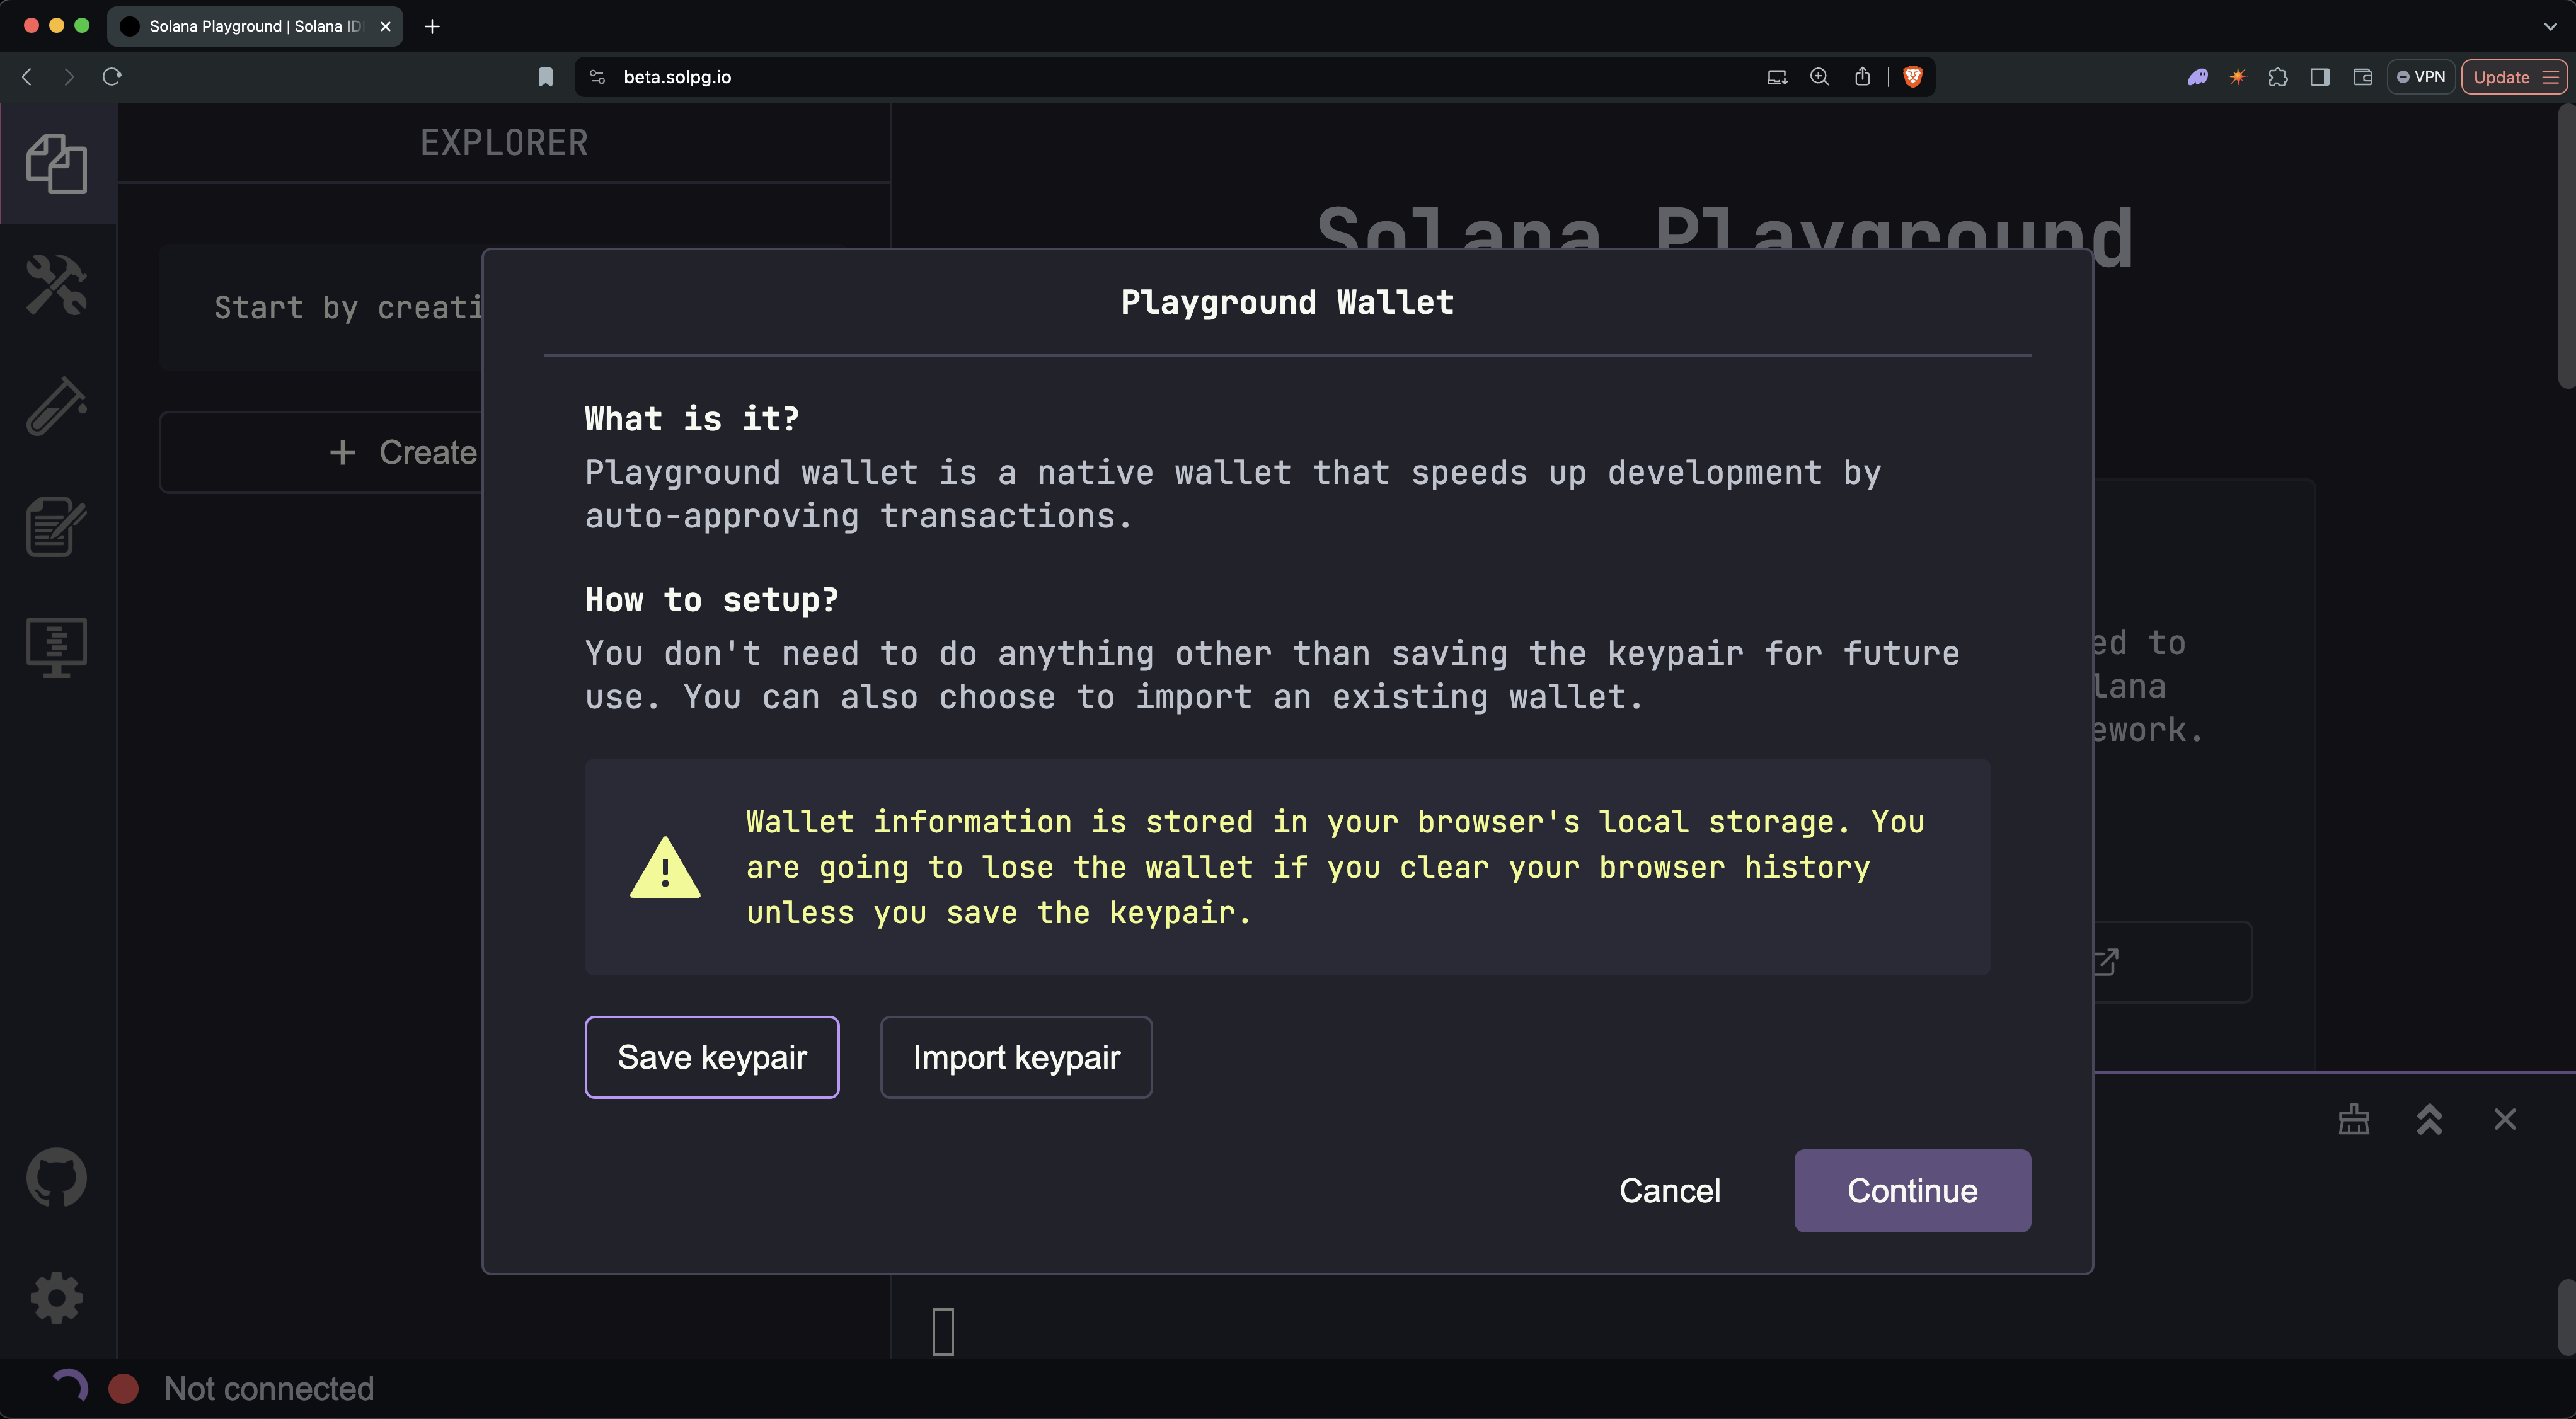 Create Playground Wallet
You should now see your wallet's address, SOL balance, and connected cluster (devnet by default) at the bottom of the window.
 Connected
Your Playground Wallet will be saved in your browser's local storage. Clearing your browser cache will remove your saved wallet.
Get Devnet SOL #
Before we start building, we first need some devnet SOL.
From a developer's perspective, SOL is required for two main use cases:
- To create accounts where we can store data or deploy programs
- To pay for transaction fees when we interact with the network
Below are two methods to fund your wallet with devnet SOL:
Option 1: Using the Playground Terminal #
To fund your Playground wallet with devnet SOL. In the Playground terminal, run:
solana airdrop 5Option 2: Using the Devnet Faucet #
If the airdrop command doesn't work (due to rate limits or errors), you can use the Web Faucet.
- Enter your wallet address (found at the bottom of the Playground screen) and select an amount
- Click "Confirm Airdrop" to receive your devnet SOL
 Faucet Airdrop
Reading from network #
Now, let's explore how to read data from the Solana network. We'll fetch a few different accounts to understand the structure of a Solana account.
On Solana, all data is contained in what we call "accounts". You can think of data on Solana as a public database with a single "Accounts" table, where each entry in this table is an individual account.
Accounts on Solana can store "state" or "executable" programs, all of which can be thought of as entries in the same "Accounts" table. Each account has an "address" (public key) that serves as its unique ID used to locate its corresponding on-chain data.
Solana accounts contain either:
- State: This is data that's meant to be read from and persisted. It could be information about tokens, user data, or any other type of data defined within a program.
- Executable Programs: These are accounts that contain the actual code of Solana programs. They contain the instructions that can be executed on the network.
This separation of program code and program state is a key feature of Solana's Account Model. For more details, refer to the Solana Account Model page.
Fetch Playground Wallet #
Let's start by looking at a familiar account - your own Playground Wallet! We'll fetch this account and examine its structure to understand what a basic Solana account looks like.
Step 1: Open the Example #
Click this link to open the example in Solana Playground. You'll see this code:
const address = pg.wallet.publicKey;
const accountInfo = await pg.connection.getAccountInfo(address);

console.log(JSON.stringify(accountInfo, null, 2));Step 2: Run the Code #
In the Playground terminal, type the run command and hit enter:
runYou should see details about your wallet account, including its balance in lamports, with output similar to the following:
Fetch Token Program #
Next, we'll examine the Token Extensions program, an executable program for interacting with tokens on Solana.
Step 1: Open the Example #
Click this link to open the example in Solana Playground. You'll see this code:
import { PublicKey } from "@solana/web3.js";

const address = new PublicKey("TokenzQdBNbLqP5VEhdkAS6EPFLC1PHnBqCXEpPxuEb");
const accountInfo = await pg.connection.getAccountInfo(address);

console.log(JSON.stringify(accountInfo, null, 2));
Instead of fetching your Playground wallet, here we fetch the address of the Token Extensions Program account.
Step 2: Run the Code #
Run the code using the run command in the terminal.
runExamine the output and how this program account differs from your wallet account.
Fetch Mint Account #
In this step, we'll examine a Mint account, which represents a unique token on the Solana network.
Step 1: Open the Example #
Click this link to open the example in Solana Playground. You'll see this code:
import { PublicKey } from "@solana/web3.js";

const address = new PublicKey("C33qt1dZGZSsqTrHdtLKXPZNoxs6U1ZBfyDkzmj6mXeR");
const accountInfo = await pg.connection.getAccountInfo(address);

console.log(JSON.stringify(accountInfo, null, 2));
In this example, we'll fetch the address of an existing Mint account on devnet.
Step 2: Run the Code #
Run the code using the run command.
runStep 3: Deserialize Mint Account Data #
To read the data field from any account, you need to deserialize the data
buffer into the expected data type. This is often done using helper functions
from client libraries for a particular program.
Open this next example in Solana Playground. You'll see this code:
import { PublicKey } from "@solana/web3.js";
import { getMint, TOKEN_2022_PROGRAM_ID } from "@solana/spl-token";

const address = new PublicKey("C33qt1dZGZSsqTrHdtLKXPZNoxs6U1ZBfyDkzmj6mXeR");
const mintData = await getMint(
  pg.connection,
  address,
  "confirmed",
  TOKEN_2022_PROGRAM_ID,
);

console.log(mintData);
This example uses the getMint helper function to automatically deserialize the
data field of the Mint account.
Run the code using the run command.
runYou should see the following deserialized Mint account data.
Writing to network #
Now that we've explored reading from the Solana network, let's learn how to write data to it. On Solana, we interact with the network by sending transactions made up of instructions. These instructions are defined by programs, which contain the business logic for how accounts should be updated.
Let's walk through two common operations, transferring SOL and creating a token, to demonstrate how to build and send transactions. For more details, refer to the Transactions and Instructions and Fees on Solana pages.
Transfer SOL #
We'll start with a simple SOL transfer from your wallet to another account. This requires invoking the transfer instruction on the System Program.
Click this link to open the example in Solana Playground. You'll see this code:
import {
  LAMPORTS_PER_SOL,
  SystemProgram,
  Transaction,
  sendAndConfirmTransaction,
  Keypair,
} from "@solana/web3.js";

const sender = pg.wallet.keypair;
const receiver = new Keypair();

const transferInstruction = SystemProgram.transfer({
  fromPubkey: sender.publicKey,
  toPubkey: receiver.publicKey,
  lamports: 0.01 * LAMPORTS_PER_SOL,
});

const transaction = new Transaction().add(transferInstruction);

const transactionSignature = await sendAndConfirmTransaction(
  pg.connection,
  transaction,
  [sender],
);

console.log(
  "Transaction Signature:",
  `https://solana.fm/tx/${transactionSignature}?cluster=devnet-solana`,
);Run the code using the run command.
runClick on the output link to view the transaction details on the SolanaFM explorer.
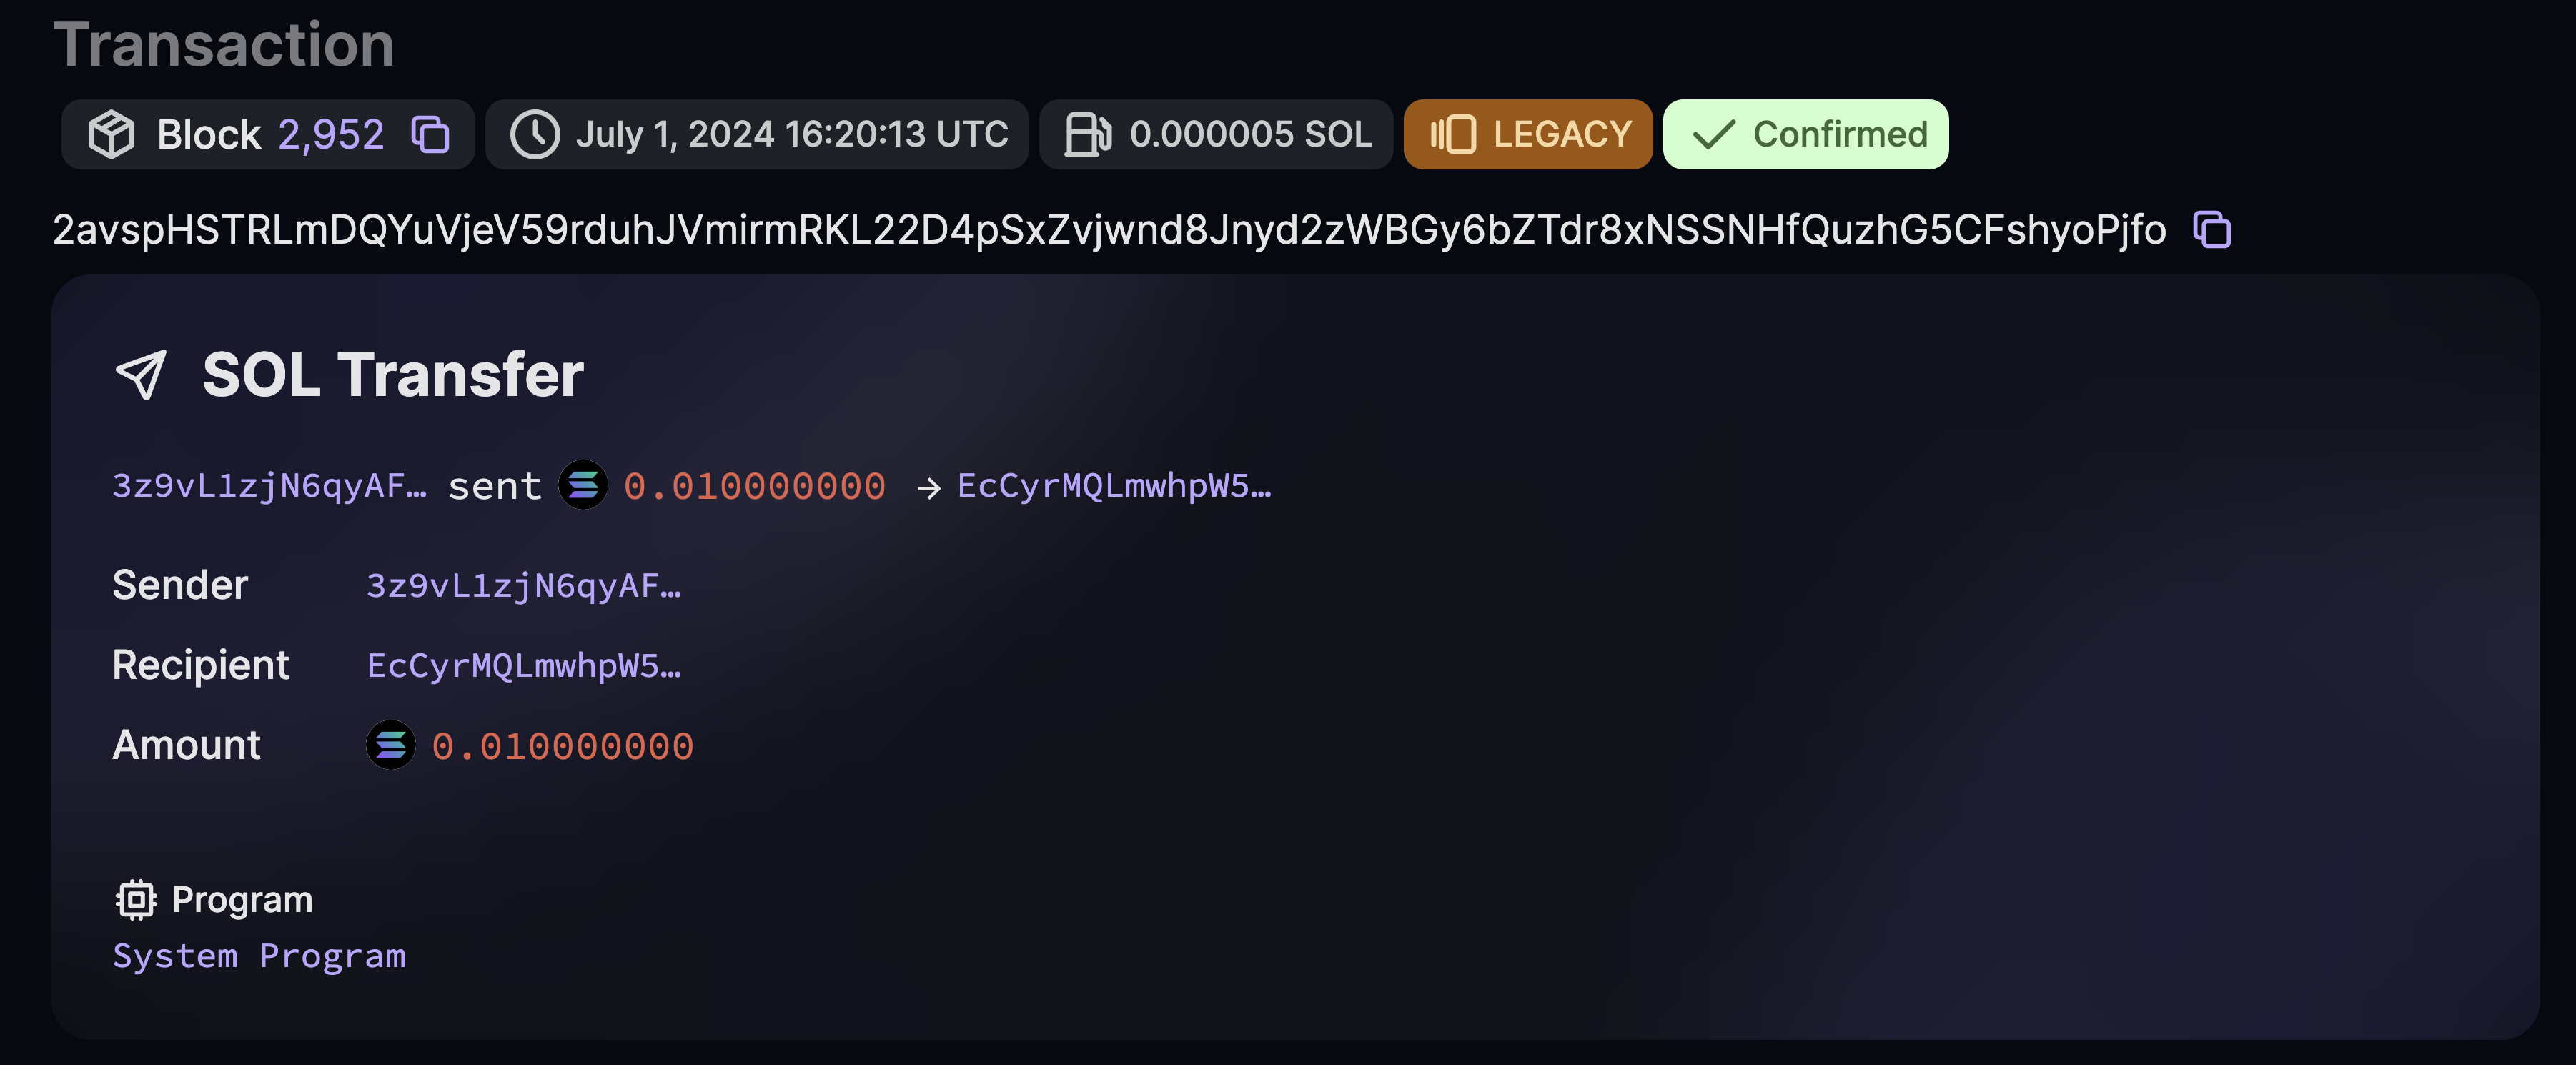 Transfer SOL
You've just sent your first transaction on Solana! Notice how we created an instruction, added it to a transaction, and then sent that transaction to the network. This is the basic process for building any transaction.
Create a Token #
Now, let's create a new token by creating and initializing a Mint account. This requires two instructions:
- Invoke the System Program to create a new account
- Invoke the Token Extensions Program
Click this link to open the example in Solana Playground. You'll see the following code:
import {
  Connection,
  Keypair,
  SystemProgram,
  Transaction,
  clusterApiUrl,
  sendAndConfirmTransaction,
} from "@solana/web3.js";
import {
  MINT_SIZE,
  TOKEN_2022_PROGRAM_ID,
  createInitializeMint2Instruction,
  getMinimumBalanceForRentExemptMint,
} from "@solana/spl-token";

const wallet = pg.wallet;
const connection = new Connection(clusterApiUrl("devnet"), "confirmed");

// Generate keypair to use as address of mint account
const mint = new Keypair();

// Calculate minimum lamports for space required by mint account
const rentLamports = await getMinimumBalanceForRentExemptMint(connection);

// Instruction to create new account with space for new mint account
const createAccountInstruction = SystemProgram.createAccount({
  fromPubkey: wallet.publicKey,
  newAccountPubkey: mint.publicKey,
  space: MINT_SIZE,
  lamports: rentLamports,
  programId: TOKEN_2022_PROGRAM_ID,
});

// Instruction to initialize mint account
const initializeMintInstruction = createInitializeMint2Instruction(
  mint.publicKey,
  2, // decimals
  wallet.publicKey, // mint authority
  wallet.publicKey, // freeze authority
  TOKEN_2022_PROGRAM_ID,
);

// Build transaction with instructions to create new account and initialize mint account
const transaction = new Transaction().add(
  createAccountInstruction,
  initializeMintInstruction,
);

const transactionSignature = await sendAndConfirmTransaction(
  connection,
  transaction,
  [
    wallet.keypair, // payer
    mint, // mint address keypair
  ],
);

console.log(
  "\nTransaction Signature:",
  `https://solana.fm/tx/${transactionSignature}?cluster=devnet-solana`,
);

console.log(
  "\nMint Account:",
  `https://solana.fm/address/${mint.publicKey}?cluster=devnet-solana`,
);Run the code using the run command.
runYou'll see two links printed to the Playground terminal:
- One for the transaction details
- One for the newly created mint account
Click the links to inspect the transaction details and the newly created mint account on SolanaFM.
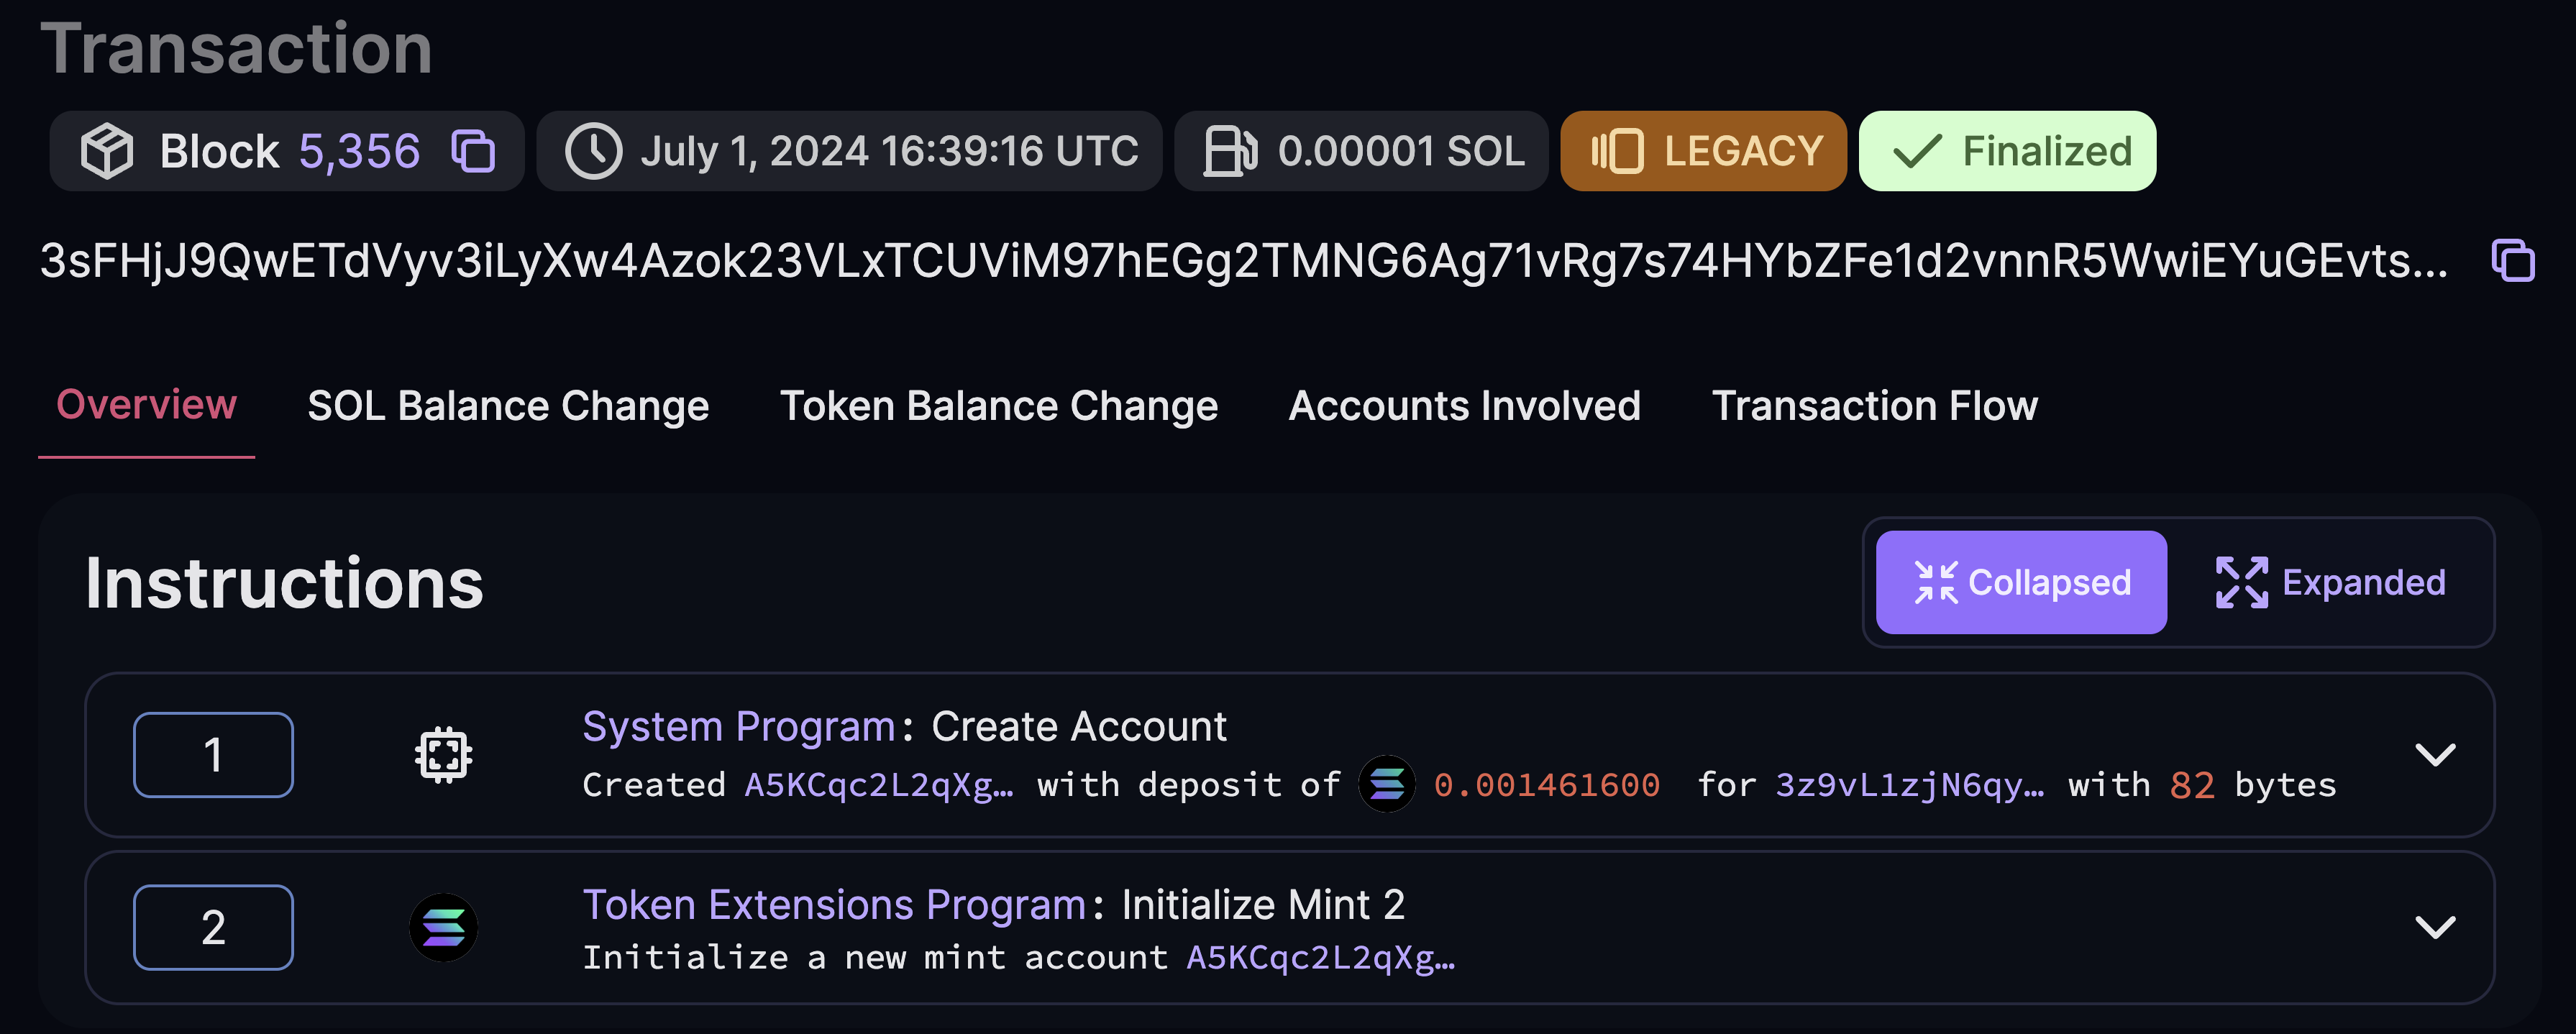 Create Token
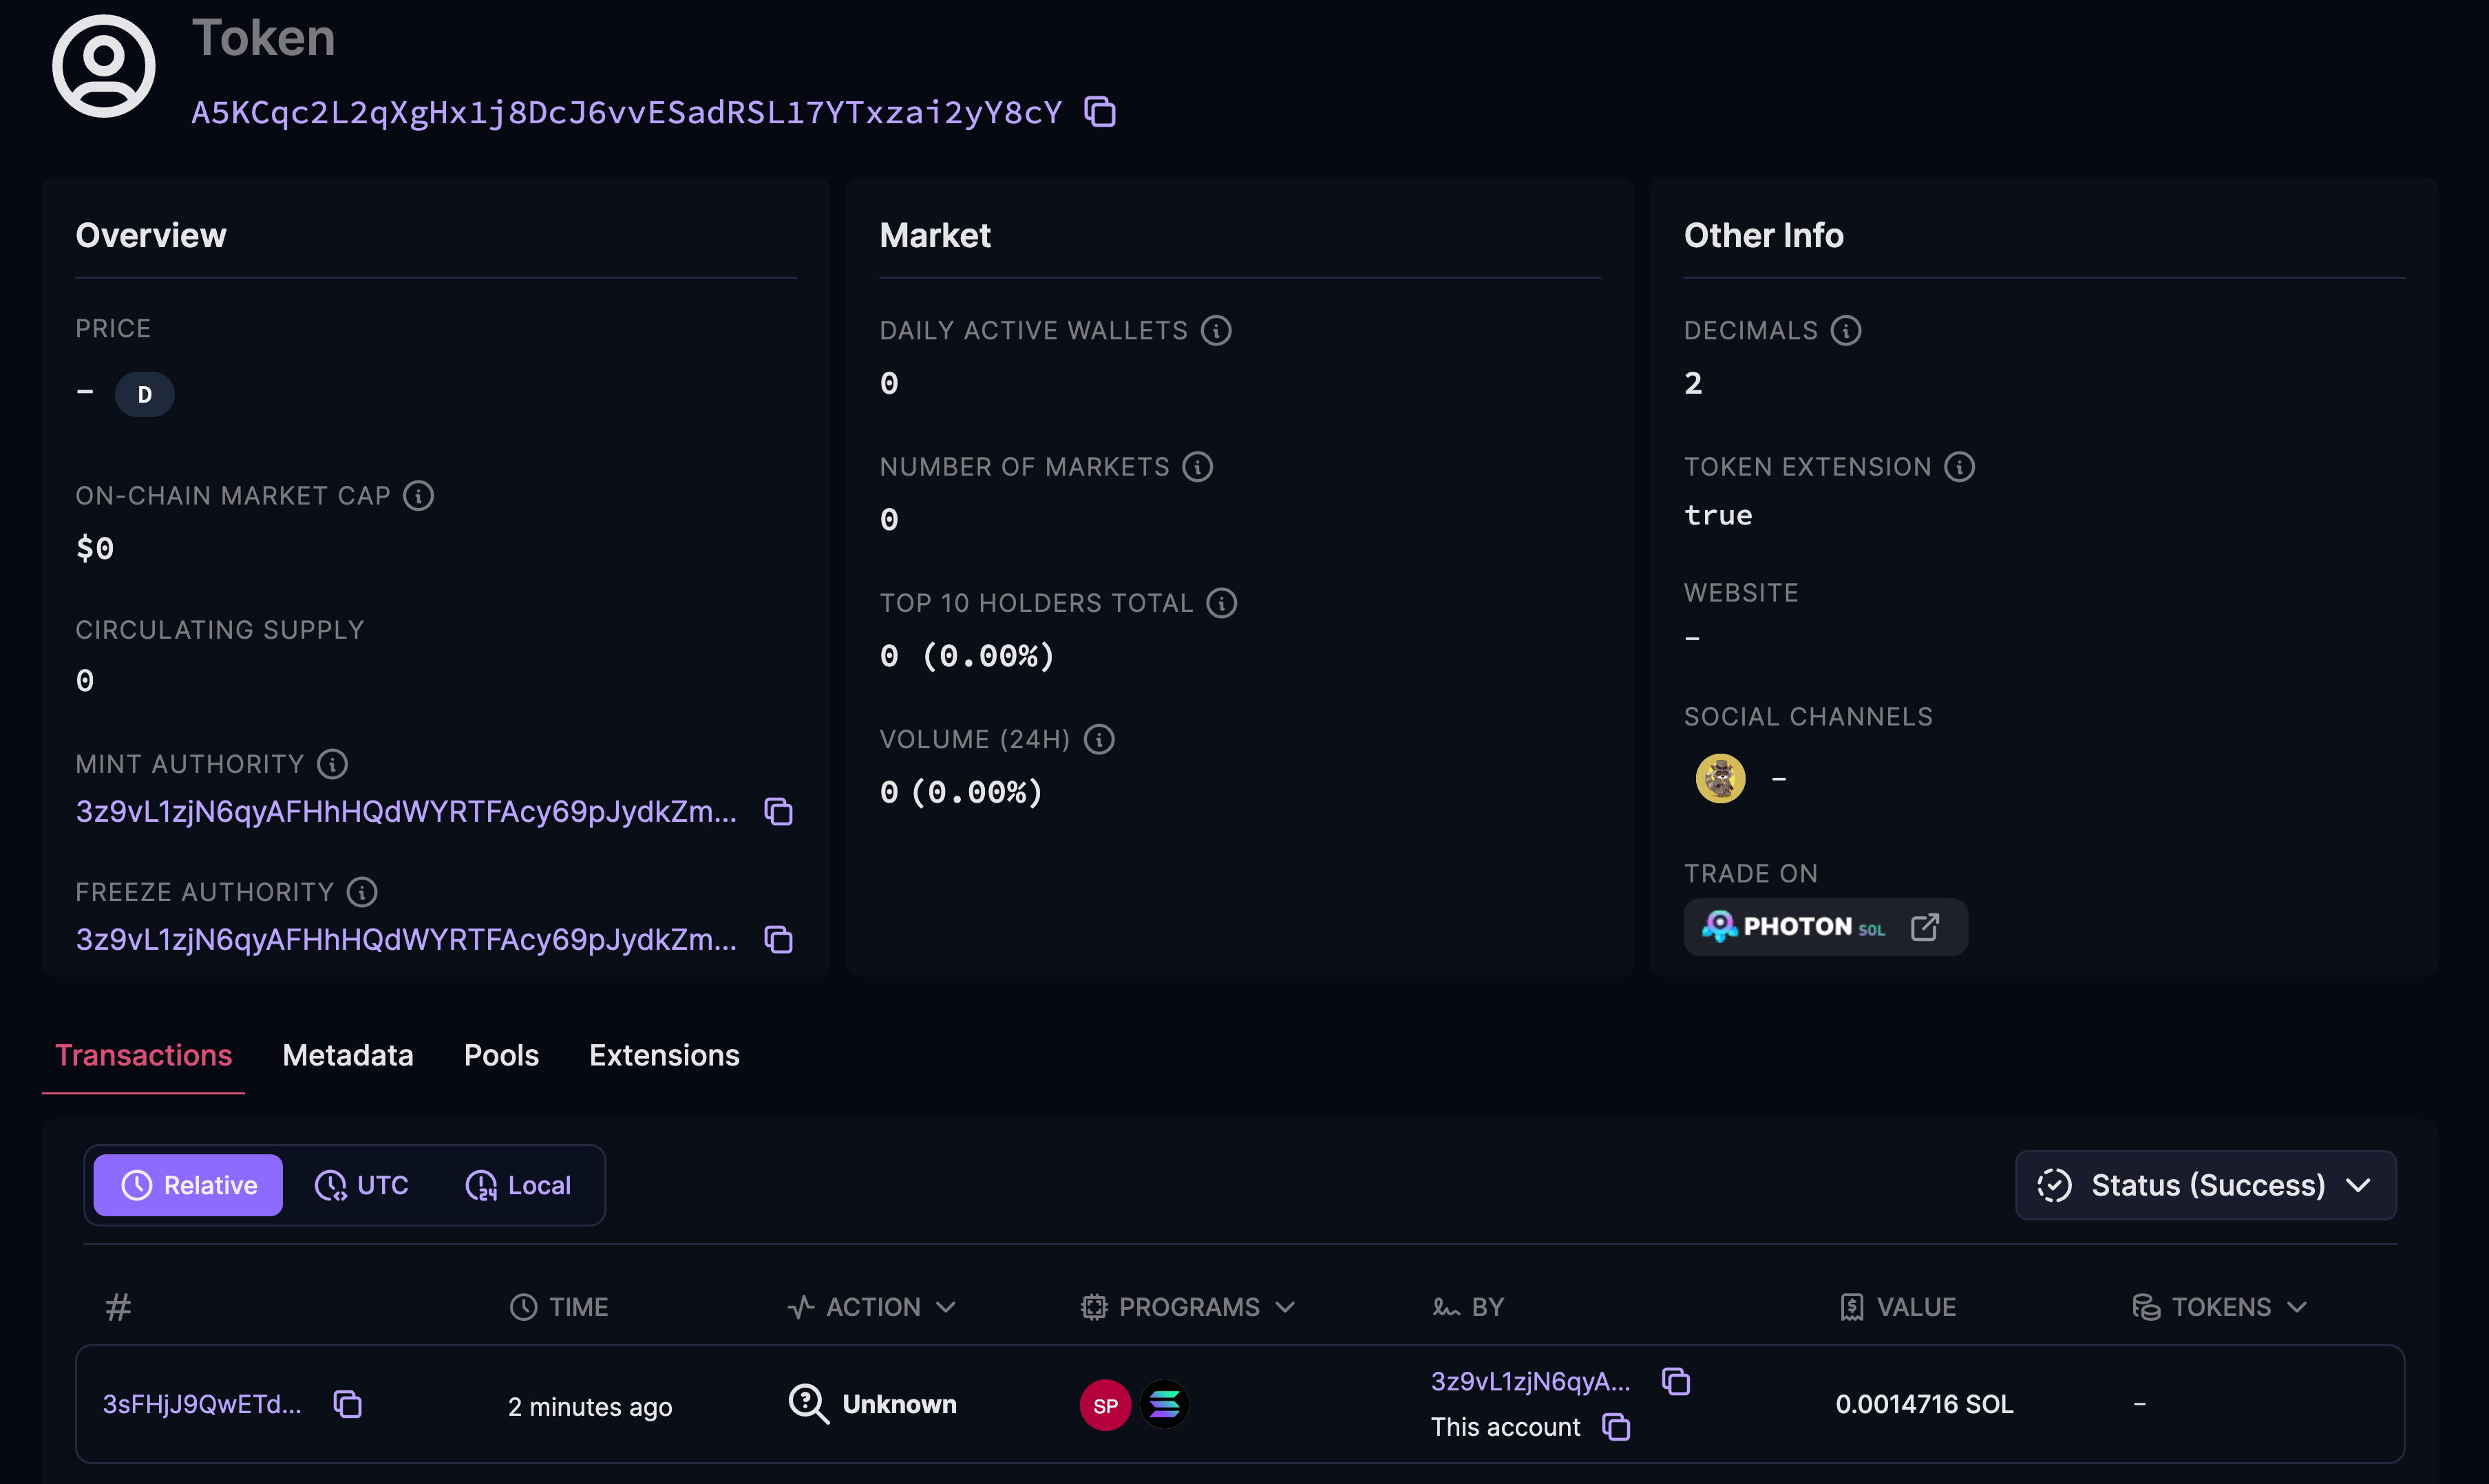 Mint Account
Notice how we built a transaction with multiple instructions this time. We first created a new account and then initialized its data as a mint. This is how you build more complex transactions that involve instructions from multiple programs.
Deploying Your First Solana Program #
In this section, we'll build, deploy, and test a simple Solana program using the Anchor framework. By the end, you'll have deployed your first program to the Solana blockchain!
The purpose of this section is to familiarize you with the Solana Playground. We'll walk through a more detailed example in the PDA and CPI sections. For more details, refer to the Programs on Solana page.
Create Anchor Project #
First, open https://beta.solpg.io in a new browser tab.
-
Click the "Create a new project" button on the left-side panel.
-
Enter a project name, select Anchor as the framework, then click the "Create" button.
 New Project
You'll see a new project created with the program code in the src/lib.rs file.
use anchor_lang::prelude::*;

// This is your program's public key and it will update
// automatically when you build the project.
declare_id!("11111111111111111111111111111111");

#[program]
mod hello_anchor {
    use super::*;
    pub fn initialize(ctx: Context<Initialize>, data: u64) -> Result<()> {
        ctx.accounts.new_account.data = data;
        msg!("Changed data to: {}!", data); // Message will show up in the tx logs
        Ok(())
    }
}

#[derive(Accounts)]
pub struct Initialize<'info> {
    // We must specify the space in order to initialize an account.
    // First 8 bytes are default account discriminator,
    // next 8 bytes come from NewAccount.data being type u64.
    // (u64 = 64 bits unsigned integer = 8 bytes)
    #[account(init, payer = signer, space = 8 + 8)]
    pub new_account: Account<'info, NewAccount>,
    #[account(mut)]
    pub signer: Signer<'info>,
    pub system_program: Program<'info, System>,
}

#[account]
pub struct NewAccount {
    data: u64
}Build and Deploy Program #
To build the program, simply run build in the terminal.
buildNotice that the address in declare_id!() has been updated. This is your
program's on-chain address.
Once the program is built, run deploy in the terminal to deploy the program to
the network (devnet by default). To deploy a program, SOL must be allocated to
the on-chain account that stores the program.
Before deployment, ensure you have enough SOL. You can get devnet SOL by either
running solana airdrop 5 in the Playground terminal or using the
Web Faucet.
deployAlternatively, you can also use the Build and Deploy buttons on the
left-side panel.
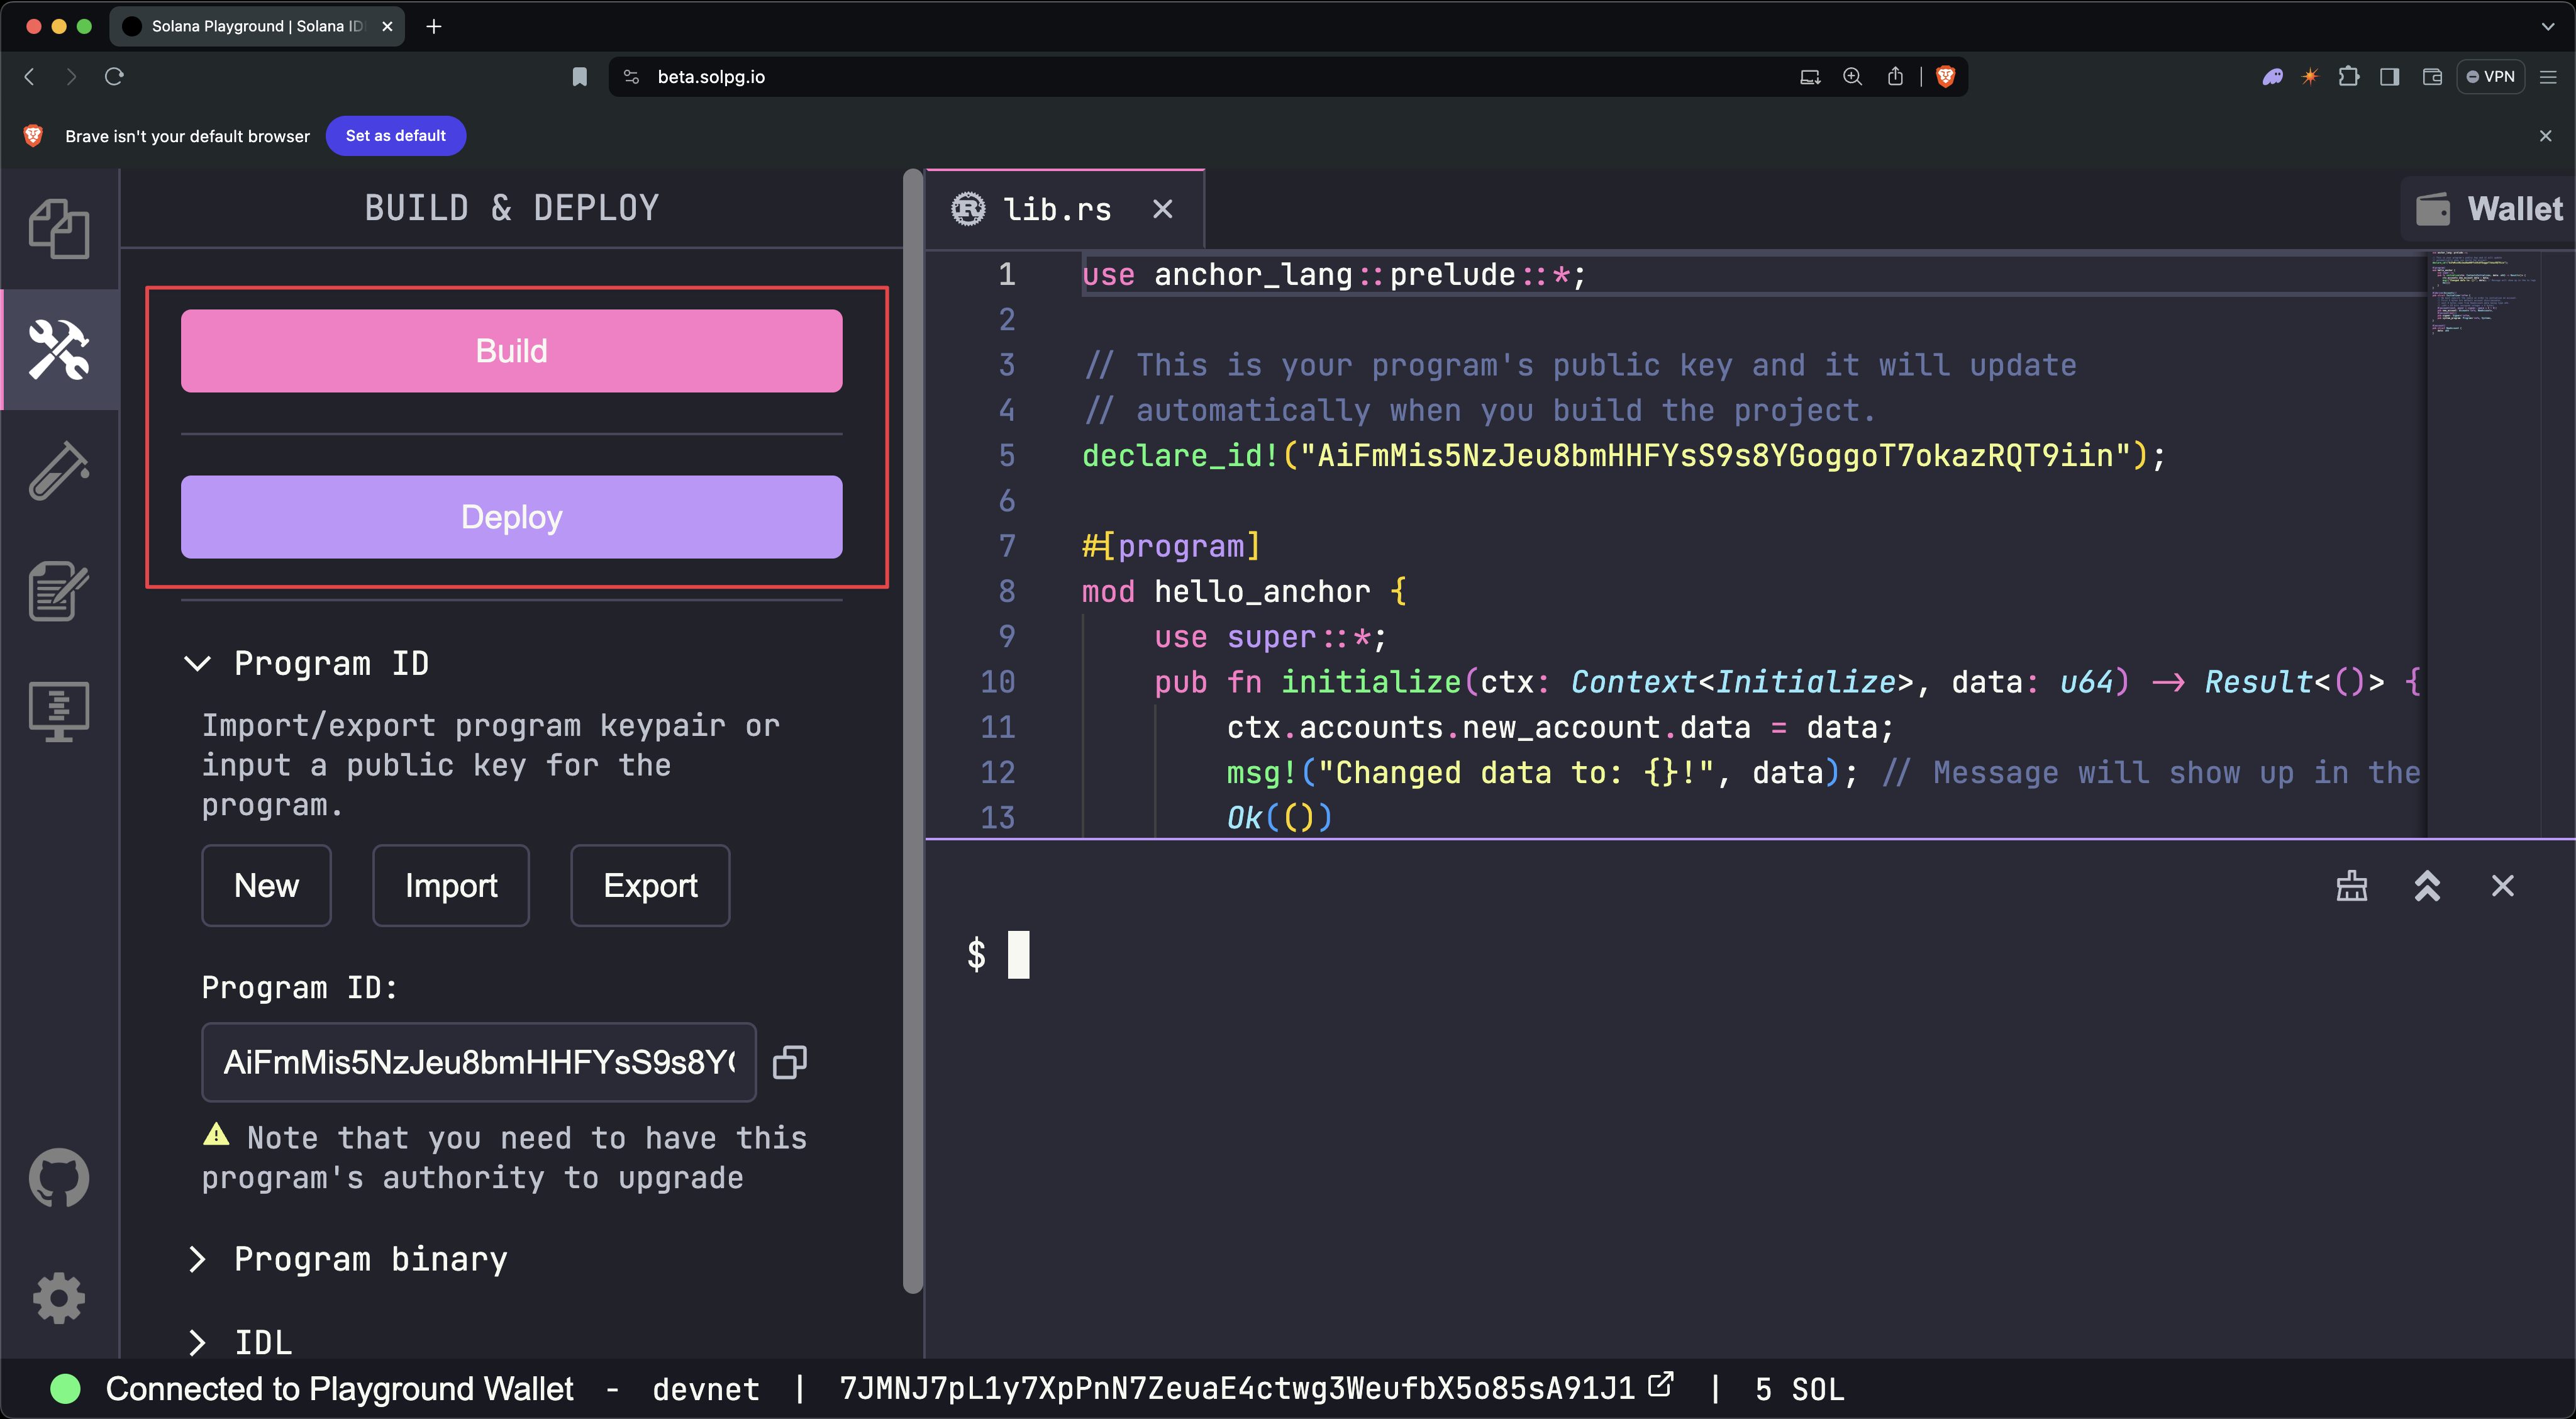 Build and Deploy
Once the program is deployed, you can now invoke its instructions.
Test Program #
Included with the starter code is a test file found in tests/anchor.test.ts.
This file demonstrates how to invoke the initialize instruction on the starter
program from the client.
// No imports needed: web3, anchor, pg and more are globally available

describe("Test", () => {
  it("initialize", async () => {
    // Generate keypair for the new account
    const newAccountKp = new web3.Keypair();

    // Send transaction
    const data = new BN(42);
    const txHash = await pg.program.methods
      .initialize(data)
      .accounts({
        newAccount: newAccountKp.publicKey,
        signer: pg.wallet.publicKey,
        systemProgram: web3.SystemProgram.programId,
      })
      .signers([newAccountKp])
      .rpc();
    console.log(`Use 'solana confirm -v ${txHash}' to see the logs`);

    // Confirm transaction
    await pg.connection.confirmTransaction(txHash);

    // Fetch the created account
    const newAccount = await pg.program.account.newAccount.fetch(
      newAccountKp.publicKey,
    );

    console.log("On-chain data is:", newAccount.data.toString());

    // Check whether the data on-chain is equal to local 'data'
    assert(data.eq(newAccount.data));
  });
});
To run the test file once the program is deployed, run test in the terminal.
testYou should see an output indicating that the test passed successfully.
You can also use the Test button on the left-side panel.
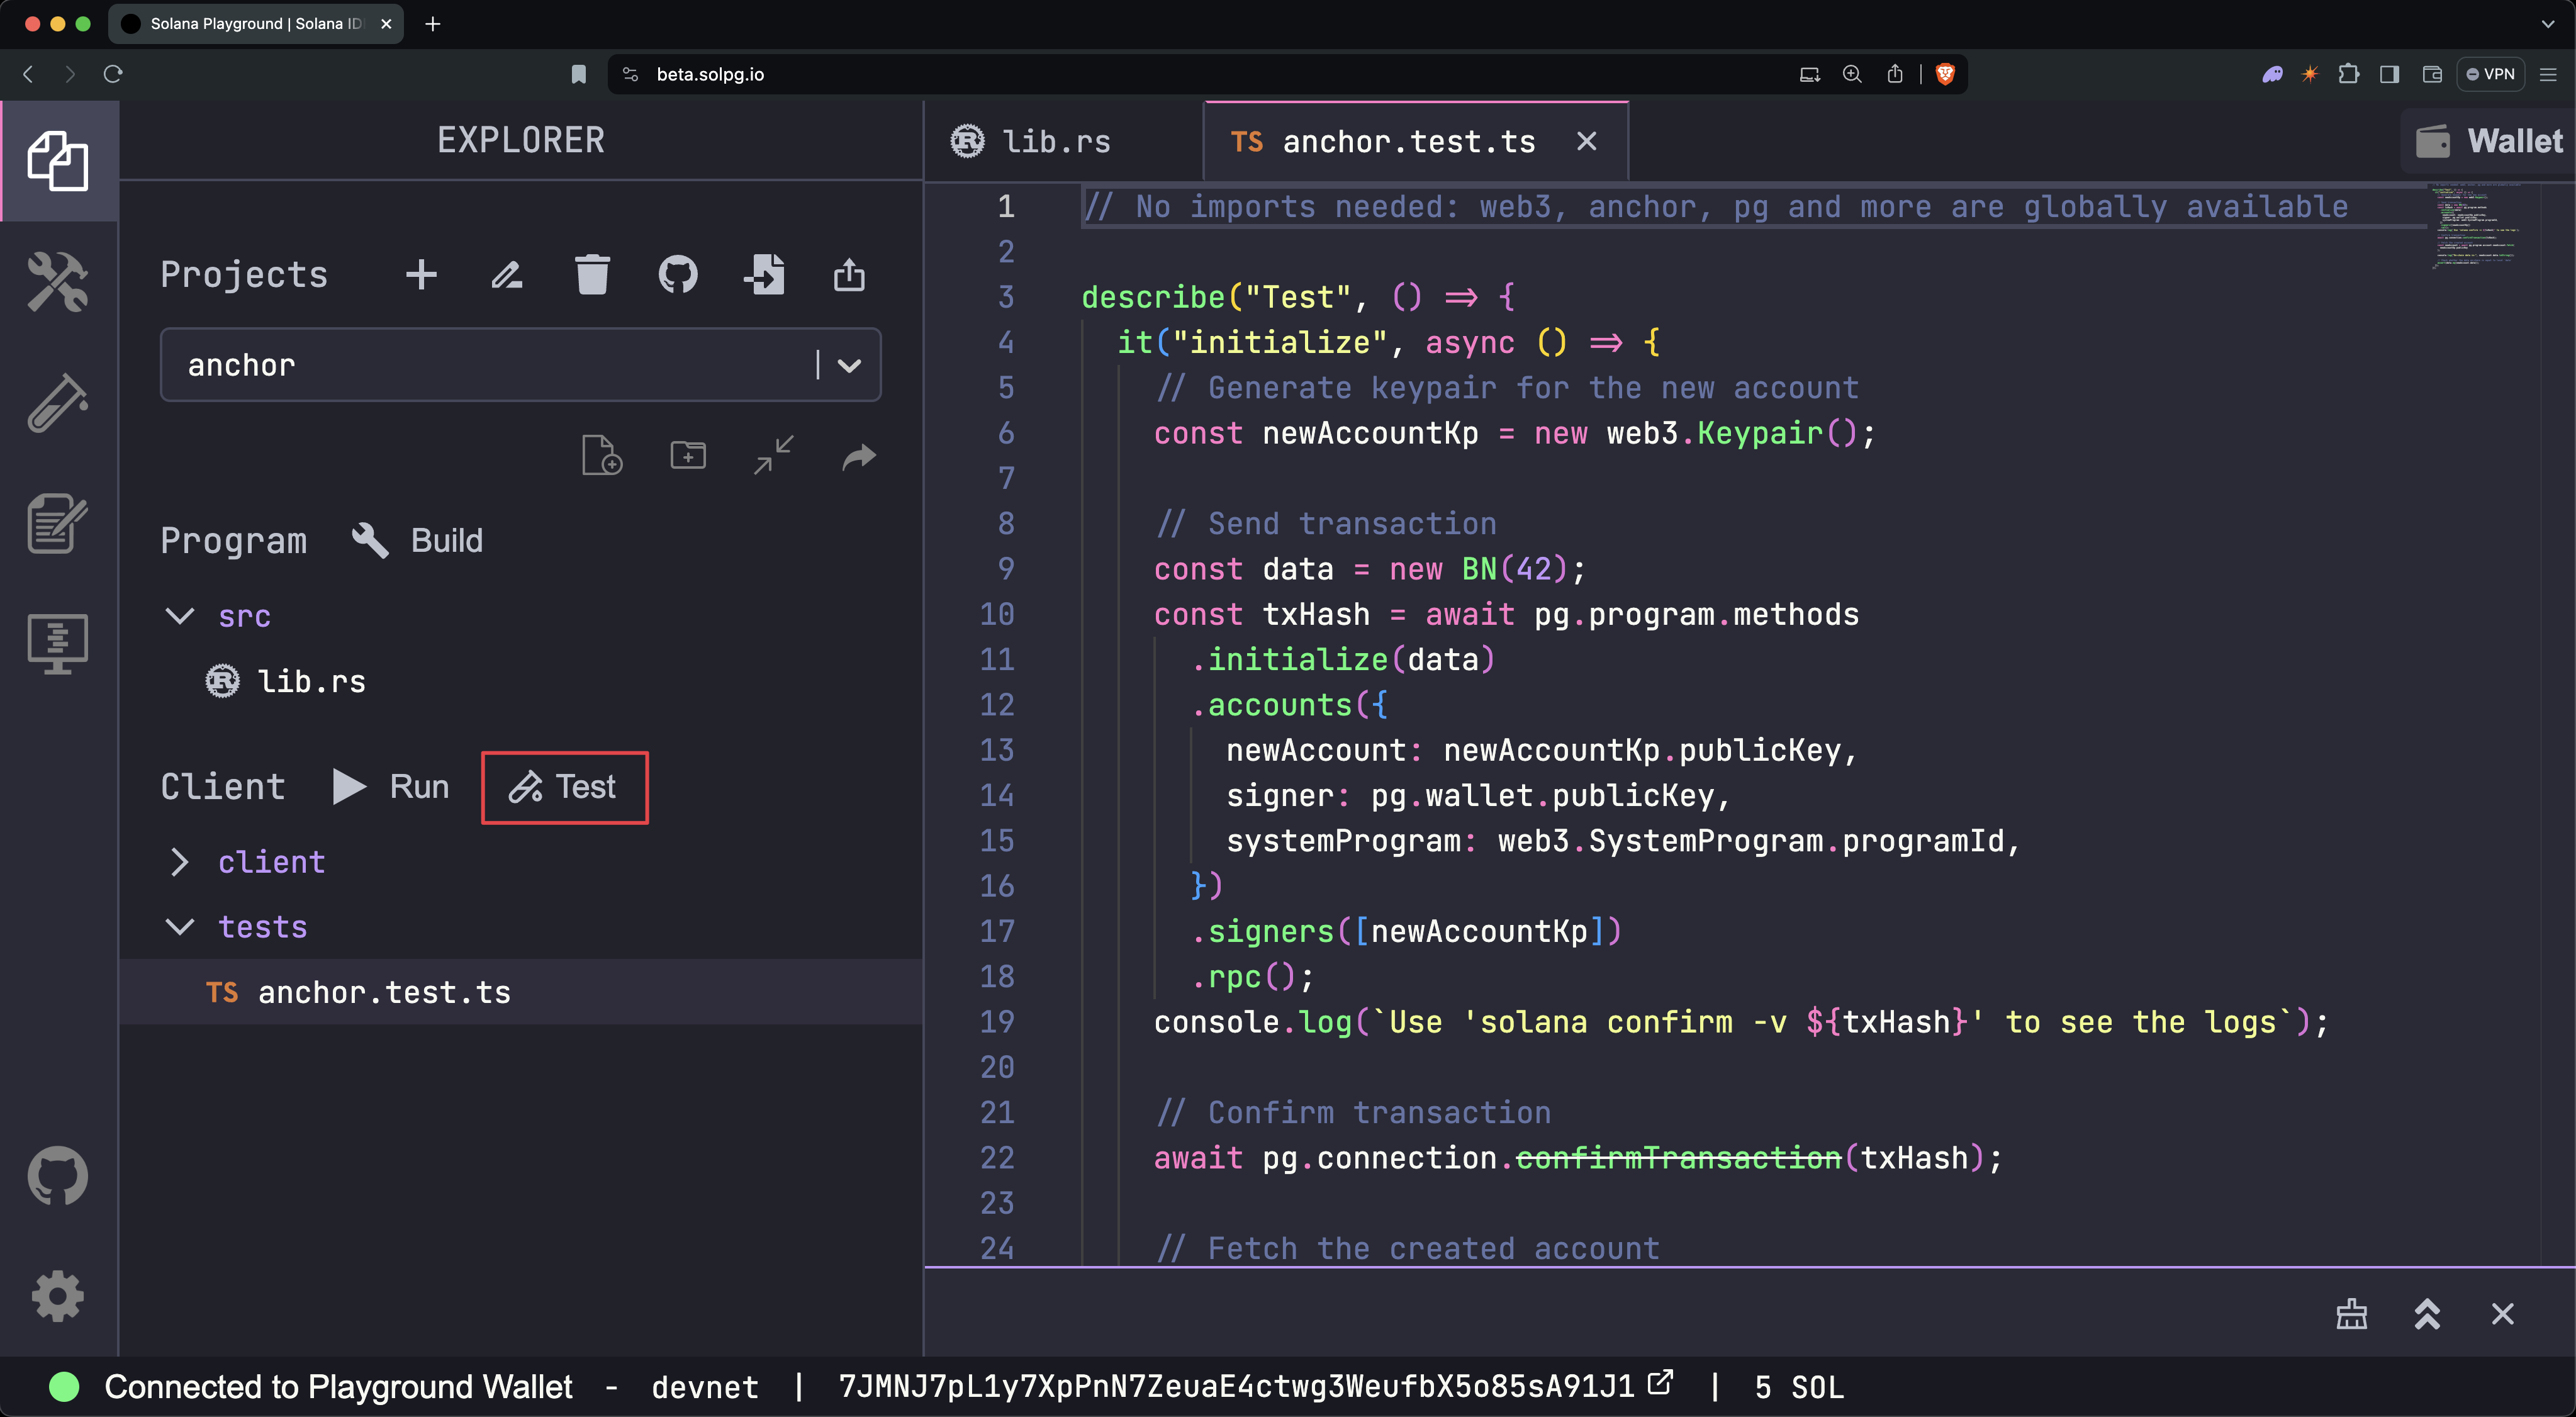 Run Test
You can then view the transaction logs by running the solana confirm -v
command and specifying the transaction hash (signature) from the test output:
solana confirm -v [TxHash]For example:
solana confirm -v 3TewJtiUz1EgtT88pLJHvKFzqrzDNuHVi8CfD2mWmHEBAaMfC5NAaHdmr19qQYfTiBace6XUmADvR4Qrhe8gH5ucAlternatively, you can view the transaction details on SolanaFM or Solana Explorer by searching for the transaction signature (hash).
Reminder to update the cluster (network) connection on the Explorer you are using to match Solana Playground. Solana Playground's default cluster is devnet.
Close Program #
Lastly, the SOL allocated to the on-chain program can be fully recovered by closing the program.
You can close a program by running the following command and specifying the
program address found in declare_id!():
solana program close [ProgramID]For example:
solana program close 2VvQ11q8xrn5tkPNyeraRsPaATdiPx8weLAD8aD4dn2rCongratulations! You've just built and deployed your first Solana program using the Anchor framework!
Program Derived Address #
In this section, we'll walk through how to build a basic CRUD (Create, Read, Update, Delete) program. The program will store a user's message using a Program Derived Address (PDA) as the account's address.
The purpose of this section is to guide you through the steps for building and testing a Solana program using the Anchor framework and demonstrating how to use PDAs within a program. For more details, refer to the Programs Derived Address page.
For reference, here is the final code after completing both the PDA and CPI sections.
Starter Code #
Begin by opening this Solana Playground link with the starter code. Then click the "Import" button, which will add the program to your list of projects on Solana Playground.
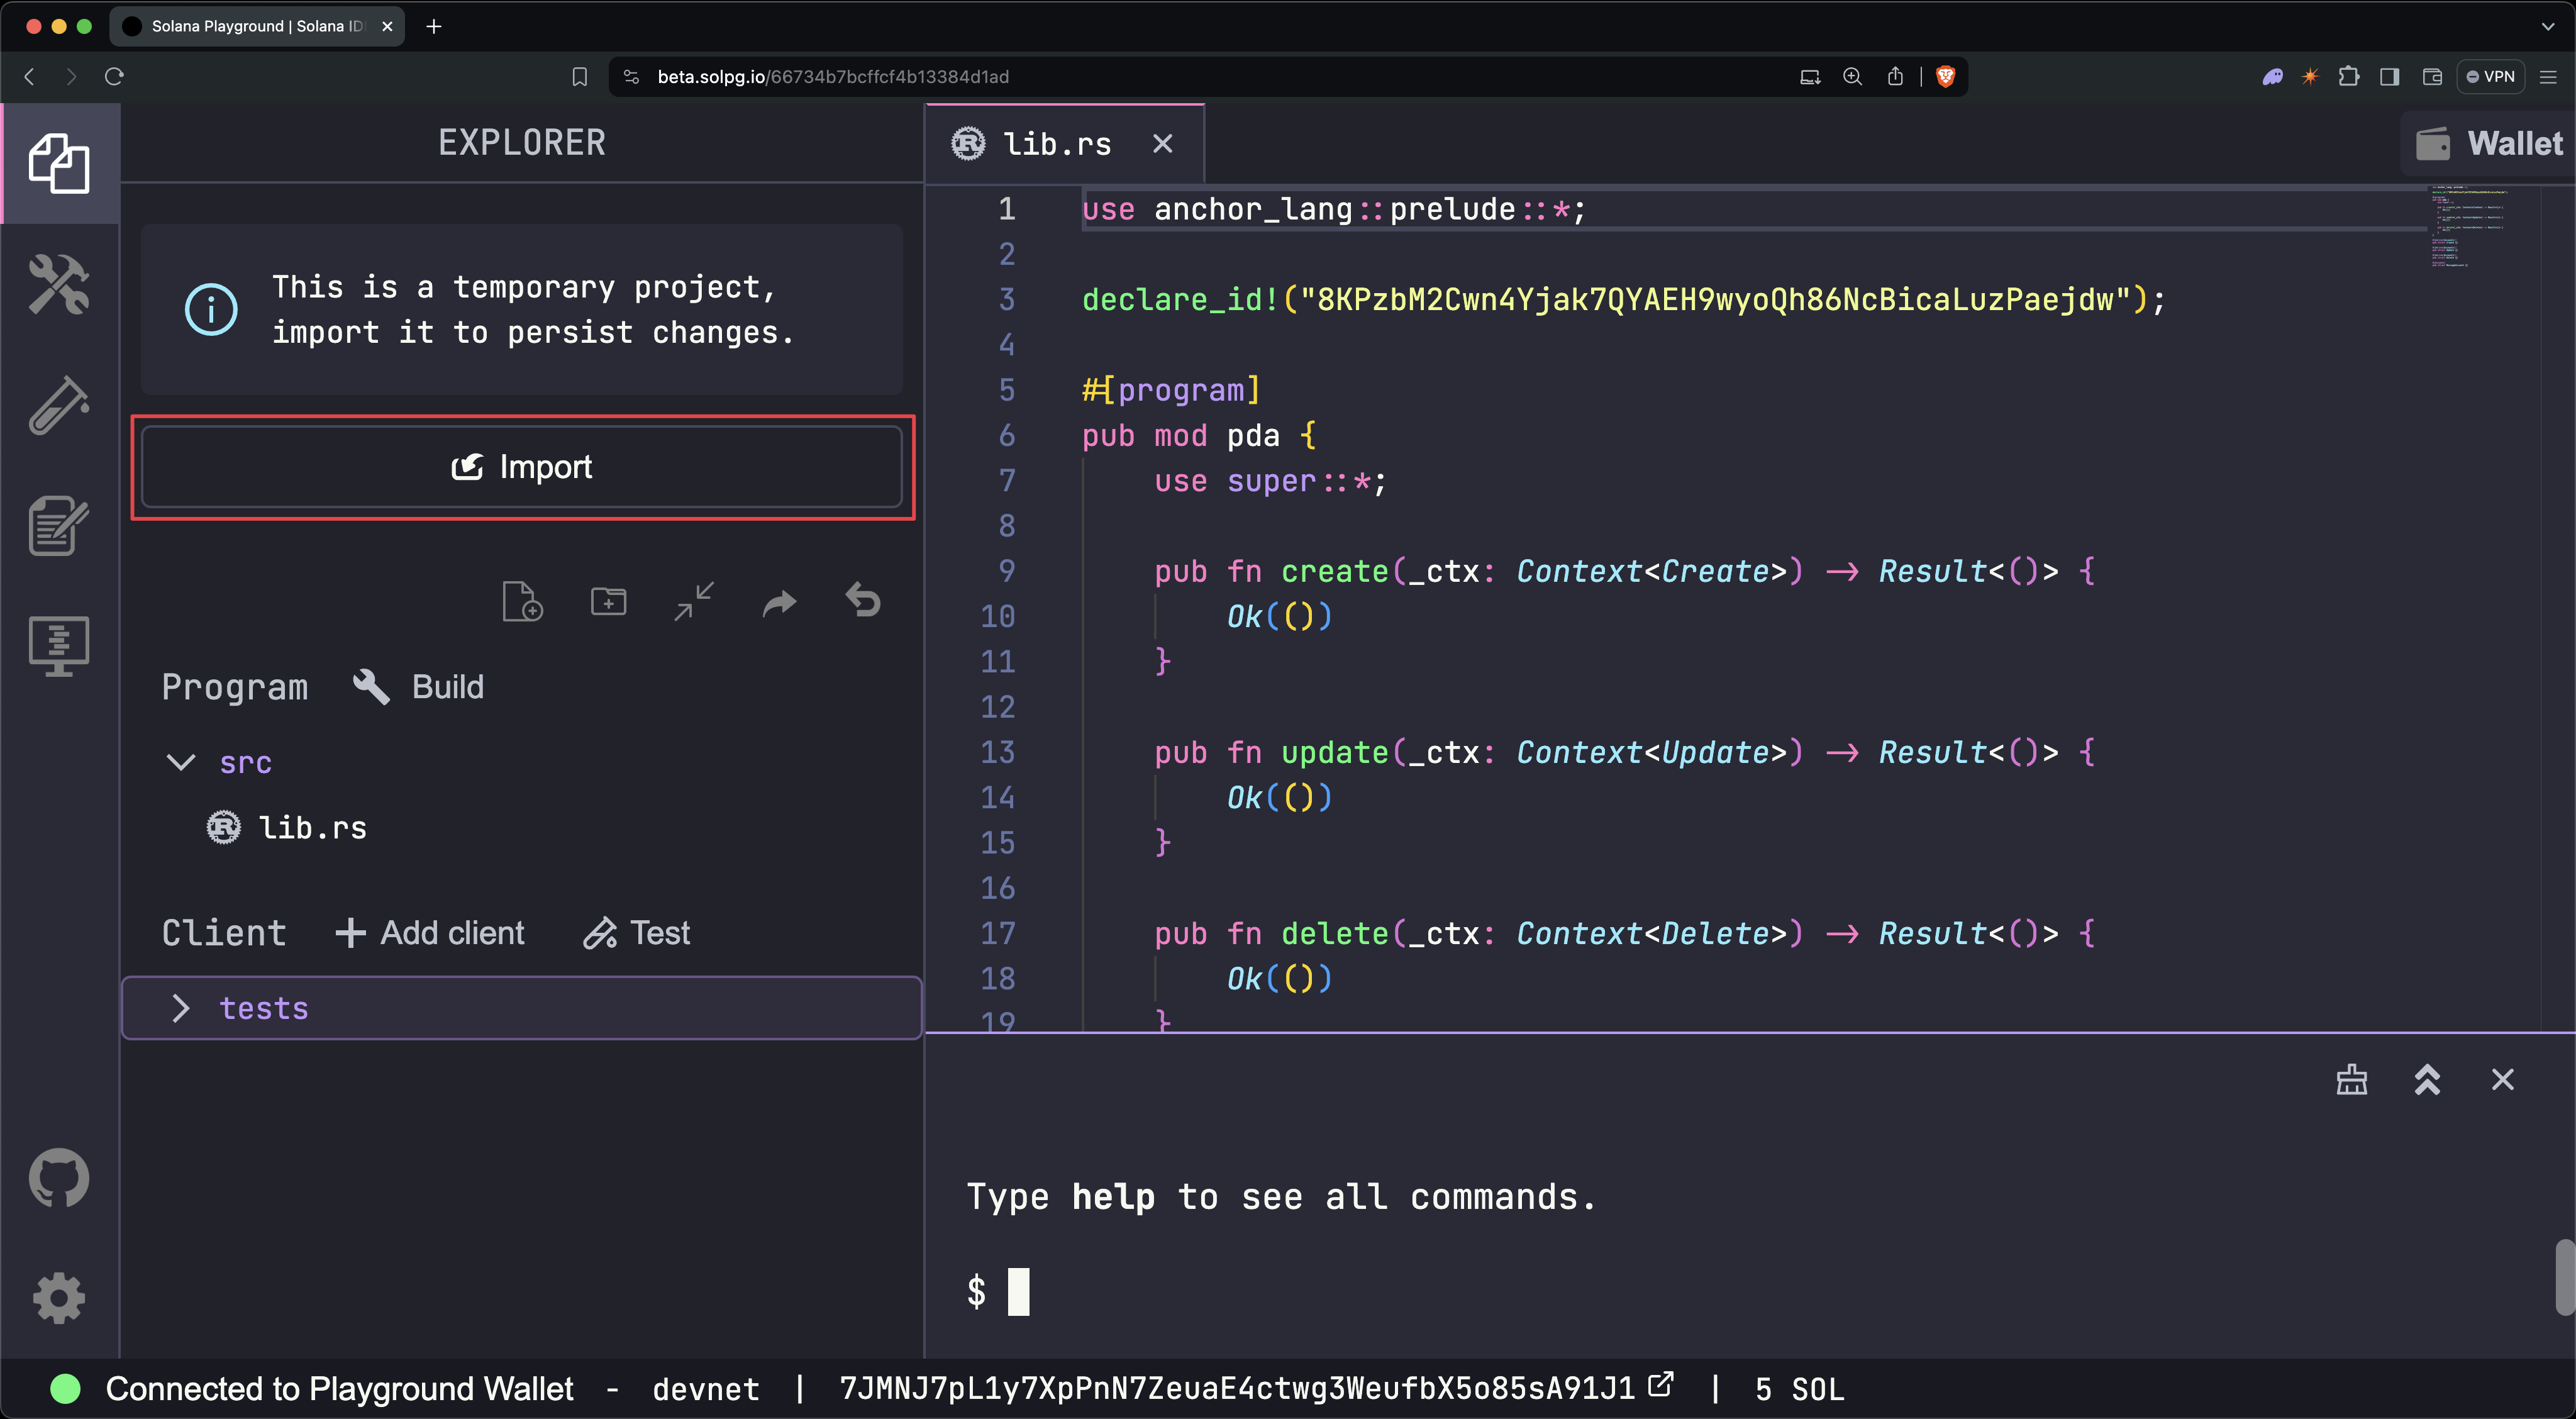 Import
In the lib.rs file, you'll find a program scaffolded with the create,
update, and delete instructions we'll implement in the following steps.
use anchor_lang::prelude::*;

declare_id!("8KPzbM2Cwn4Yjak7QYAEH9wyoQh86NcBicaLuzPaejdw");

#[program]
pub mod pda {
    use super::*;

    pub fn create(_ctx: Context<Create>) -> Result<()> {
        Ok(())
    }

    pub fn update(_ctx: Context<Update>) -> Result<()> {
        Ok(())
    }

    pub fn delete(_ctx: Context<Delete>) -> Result<()> {
        Ok(())
    }
}

#[derive(Accounts)]
pub struct Create {}

#[derive(Accounts)]
pub struct Update {}

#[derive(Accounts)]
pub struct Delete {}

#[account]
pub struct MessageAccount {}
Before we begin, run build in the Playground terminal to check the starter
program builds successfully.
buildDefine Message Account Type #
First, let's define the structure for the message account that our program will create. This is the data that we'll store in the account created by the program.
In lib.rs, update the MessageAccount struct with the following:
#[account]
pub struct MessageAccount {
    pub user: Pubkey,
    pub message: String,
    pub bump: u8,
}Build the program again by running build in the terminal.
buildWe've defined what our message account will look like. Next, we'll implement the program instructions.
Implement Create Instruction #
Now, let's implement the create instruction to create and initialize the
MessageAccount.
Start by defining the accounts required for the instruction by updating the
Create struct with the following:
#[derive(Accounts)]
#[instruction(message: String)]
pub struct Create<'info> {
    #[account(mut)]
    pub user: Signer<'info>,

    #[account(
        init,
        seeds = [b"message", user.key().as_ref()],
        bump,
        payer = user,
        space = 8 + 32 + 4 + message.len() + 1
    )]
    pub message_account: Account<'info, MessageAccount>,
    pub system_program: Program<'info, System>,
}Next, implement the business logic for the create instruction by updating the
create function with the following:
pub fn create(ctx: Context<Create>, message: String) -> Result<()> {
    msg!("Create Message: {}", message);
    let account_data = &mut ctx.accounts.message_account;
    account_data.user = ctx.accounts.user.key();
    account_data.message = message;
    account_data.bump = ctx.bumps.message_account;
    Ok(())
}Rebuild the program.
buildImplement Update Instruction #
Next, implement the update instruction to update the MessageAccount with a
new message.
Just as before, the first step is to specify the accounts required by the
update instruction.
Update the Update struct with the following:
#[derive(Accounts)]
#[instruction(message: String)]
pub struct Update<'info> {
    #[account(mut)]
    pub user: Signer<'info>,

    #[account(
        mut,
        seeds = [b"message", user.key().as_ref()],
        bump = message_account.bump,
        realloc = 8 + 32 + 4 + message.len() + 1,
        realloc::payer = user,
        realloc::zero = true,
    )]
    pub message_account: Account<'info, MessageAccount>,
    pub system_program: Program<'info, System>,
}Next, implement the logic for the update instruction.
pub fn update(ctx: Context<Update>, message: String) -> Result<()> {
    msg!("Update Message: {}", message);
    let account_data = &mut ctx.accounts.message_account;
    account_data.message = message;
    Ok(())
}Rebuld the program
buildImplement Delete Instruction #
Next, implement the delete instruction to close the MessageAccount.
Update the Delete struct with the following:
#[derive(Accounts)]
pub struct Delete<'info> {
    #[account(mut)]
    pub user: Signer<'info>,

    #[account(
        mut,
        seeds = [b"message", user.key().as_ref()],
        bump = message_account.bump,
        close= user,
    )]
    pub message_account: Account<'info, MessageAccount>,
}Next, implement the logic for the update instruction.
pub fn delete(_ctx: Context<Delete>) -> Result<()> {
    msg!("Delete Message");
    Ok(())
}Rebuild the program.
buildDeploy Program #
The basic CRUD program is now complete. Deploy the program by running deploy
in the Playground terminal.
deploySet Up Test File #
Included with the starter code is also a test file in anchor.test.ts.
import { PublicKey } from "@solana/web3.js";

describe("pda", () => {
  it("Create Message Account", async () => {});

  it("Update Message Account", async () => {});

  it("Delete Message Account", async () => {});
});
Add the code below inside describe, but before the it sections.
const program = pg.program;
const wallet = pg.wallet;

const [messagePda, messageBump] = PublicKey.findProgramAddressSync(
  [Buffer.from("message"), wallet.publicKey.toBuffer()],
  program.programId,
);Run the test file by running test in the Playground terminal to check the file
runs as expected. We will implement the tests in the following steps.
testInvoke Create Instruction #
Update the first test with the following:
it("Create Message Account", async () => {
  const message = "Hello, World!";
  const transactionSignature = await program.methods
    .create(message)
    .accounts({
      messageAccount: messagePda,
    })
    .rpc({ commitment: "confirmed" });

  const messageAccount = await program.account.messageAccount.fetch(
    messagePda,
    "confirmed",
  );

  console.log(JSON.stringify(messageAccount, null, 2));
  console.log(
    "Transaction Signature:",
    `https://solana.fm/tx/${transactionSignature}?cluster=devnet-solana`,
  );
});Invoke Update Instruction #
Update the second test with the following:
it("Update Message Account", async () => {
  const message = "Hello, Solana!";
  const transactionSignature = await program.methods
    .update(message)
    .accounts({
      messageAccount: messagePda,
    })
    .rpc({ commitment: "confirmed" });

  const messageAccount = await program.account.messageAccount.fetch(
    messagePda,
    "confirmed",
  );

  console.log(JSON.stringify(messageAccount, null, 2));
  console.log(
    "Transaction Signature:",
    `https://solana.fm/tx/${transactionSignature}?cluster=devnet-solana`,
  );
});Invoke Delete Instruction #
Update the third test with the following:
it("Delete Message Account", async () => {
  const transactionSignature = await program.methods
    .delete()
    .accounts({
      messageAccount: messagePda,
    })
    .rpc({ commitment: "confirmed" });

  const messageAccount = await program.account.messageAccount.fetchNullable(
    messagePda,
    "confirmed",
  );

  console.log("Expect Null:", JSON.stringify(messageAccount, null, 2));
  console.log(
    "Transaction Signature:",
    `https://solana.fm/tx/${transactionSignature}?cluster=devnet-solana`,
  );
});Run Test #
Once the tests are set up, run the test file by running test in the Playground
terminal.
testCross Program Invocation #
In this section, we'll update our existing CRUD program to include Cross Program
Invocations (CPIs). We'll modify the program to transfer SOL between accounts in
the update and delete instructions, demonstrating how to interact with other
programs (in this case, the System Program) from within our program.
The purpose of this section is to walk through the process of implementing CPIs in a Solana program using the Anchor framework, building upon the PDA concepts we explored in the previous section. For more details, refer to the Cross Program Invocation page.
Modify Update Instruction #
First, we'll implement a simple "pay-to-update" mechanism by modifying the
Update struct and update function.
Begin by updating the lib.rs file to bring into scope items from the
system_program module.
use anchor_lang::system_program::{transfer, Transfer};Next, update the Update struct to include an additional account called
vault_account. This account, controlled by our program, will receive SOL from
a user when they update their message account.
#[account(
    mut,
    seeds = [b"vault", user.key().as_ref()],
    bump,
)]
pub vault_account: SystemAccount<'info>,Next, implement the CPI logic in the update instruction to transfer 0.001 SOL
from the user's account to the vault account.
let transfer_accounts = Transfer {
    from: ctx.accounts.user.to_account_info(),
    to: ctx.accounts.vault_account.to_account_info(),
};
let cpi_context = CpiContext::new(
    ctx.accounts.system_program.to_account_info(),
    transfer_accounts,
);
transfer(cpi_context, 1_000_000)?;Rebuild the program.
buildModify Delete Instruction #
We'll now implement a "refund on delete" mechanism by modifying the Delete
struct and delete function.
First, update the Delete struct to include the vault_account. This allows us
to transfer any SOL in the vault back to the user when they close their message
account.
#[account(
    mut,
    seeds = [b"vault", user.key().as_ref()],
    bump,
)]
pub vault_account: SystemAccount<'info>,
Also add the system_program as the CPI for the transfer requires invoking the
System Program.
pub system_program: Program<'info, System>,Next, implement the CPI logic in the delete instruction to transfer SOL from
the vault account back to the user's account.
let user_key = ctx.accounts.user.key();
let signer_seeds: &[&[&[u8]]] =
    &[&[b"vault", user_key.as_ref(), &[ctx.bumps.vault_account]]];

let transfer_accounts = Transfer {
    from: ctx.accounts.vault_account.to_account_info(),
    to: ctx.accounts.user.to_account_info(),
};
let cpi_context = CpiContext::new(
    ctx.accounts.system_program.to_account_info(),
    transfer_accounts,
).with_signer(signer_seeds);
transfer(cpi_context, ctx.accounts.vault_account.lamports())?;
Note that we updated _ctx: Context<Delete> to ctx: Context<Delete> as we'll
be using the context in the body of the function.
Rebuild the program.
buildRedeploy Program #
After making these changes, we need to redeploy our updated program. This ensures that our modified program is available for testing. On Solana, updating a program simply requires deploying the compiled program at the same program ID.
deployUpdate Test File #
Next, we'll update our anchor.test.ts file to include the new vault account in
our instructions. This requires deriving the vault PDA and including it in our
update and delete instruction calls.
Derive Vault PDA #
First, add the vault PDA derivation:
const [vaultPda, vaultBump] = PublicKey.findProgramAddressSync(
  [Buffer.from("vault"), wallet.publicKey.toBuffer()],
  program.programId,
);Modify Update Test #
Then, update the update instruction to include the vaultAccount.
const transactionSignature = await program.methods
  .update(message)
  .accounts({
    messageAccount: messagePda,
    vaultAccount: vaultPda,
  })
.rpc({ commitment: "confirmed" });Modify Delete Test #
Then, update the delete instruction to include the vaultAccount.
const transactionSignature = await program.methods
  .delete()
  .accounts({
    messageAccount: messagePda,
    vaultAccount: vaultPda,
  })
.rpc({ commitment: "confirmed" });Rerun Test #
After making these changes, run the tests to ensure everything is working as expected:
testYou can then inspect the SolanFM links to view the transaction details, where you’ll find the CPIs for the transfer instructions within the update and delete instructions.
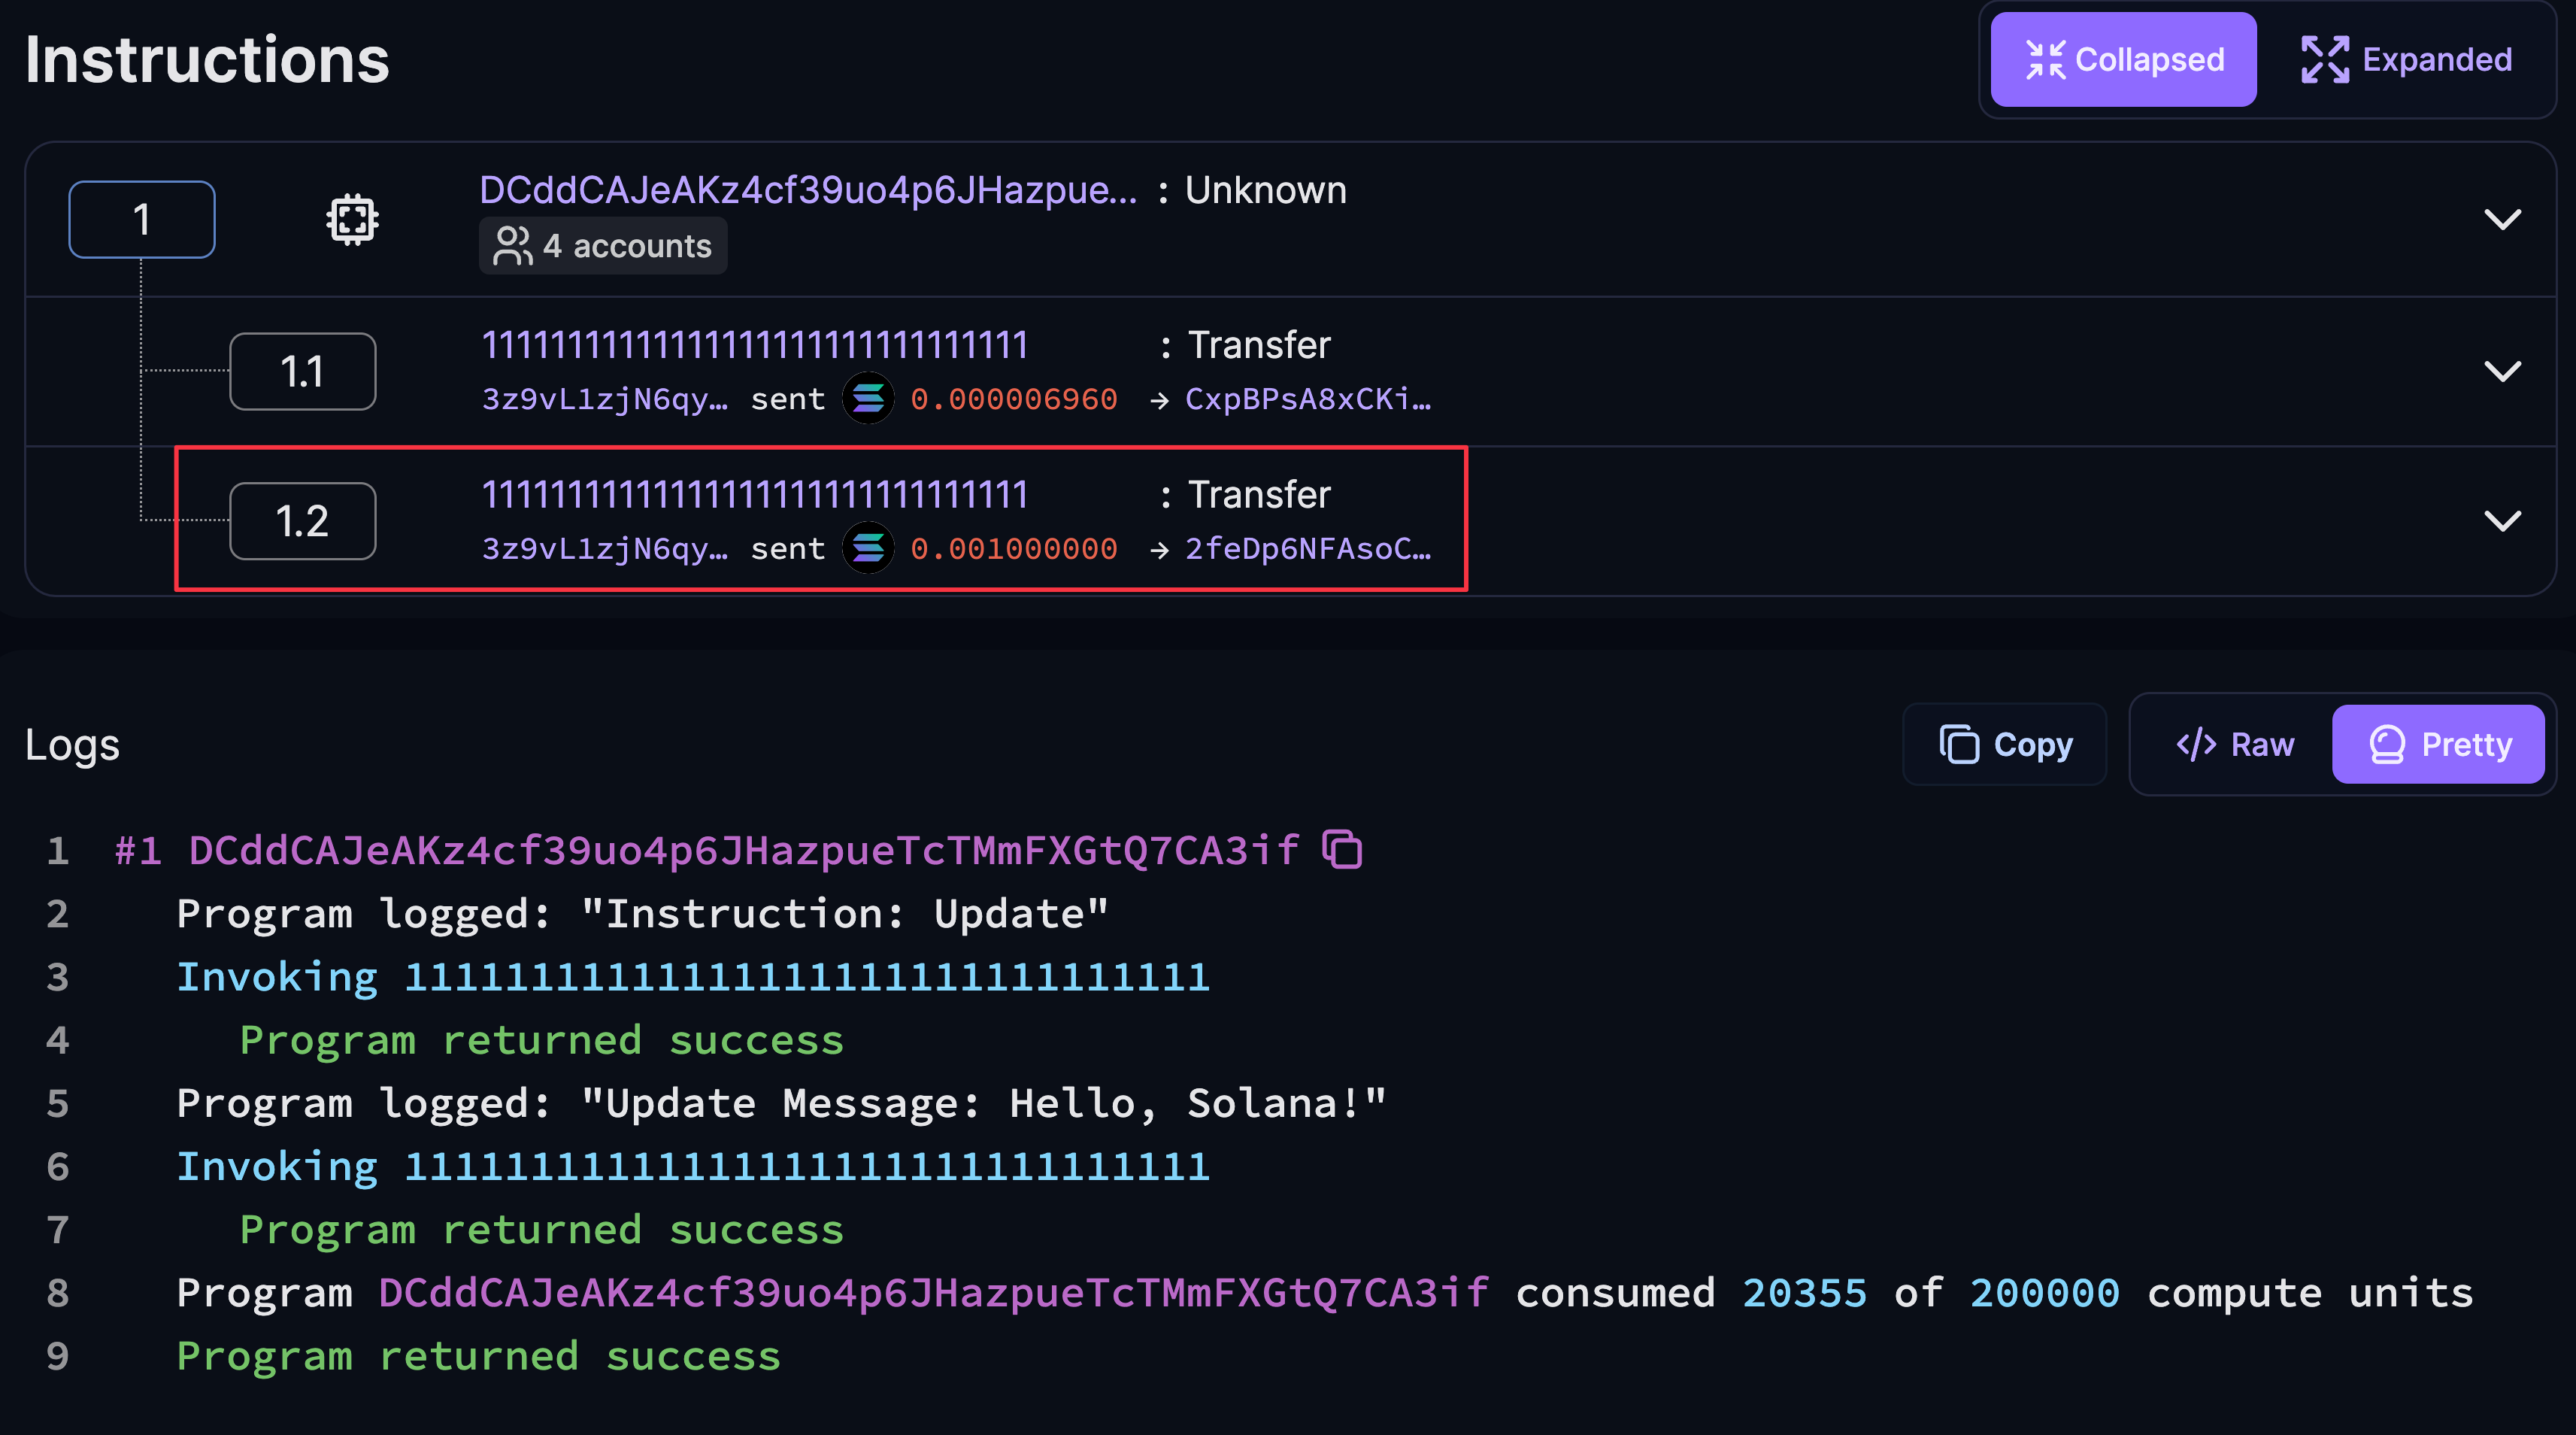 Update CPI
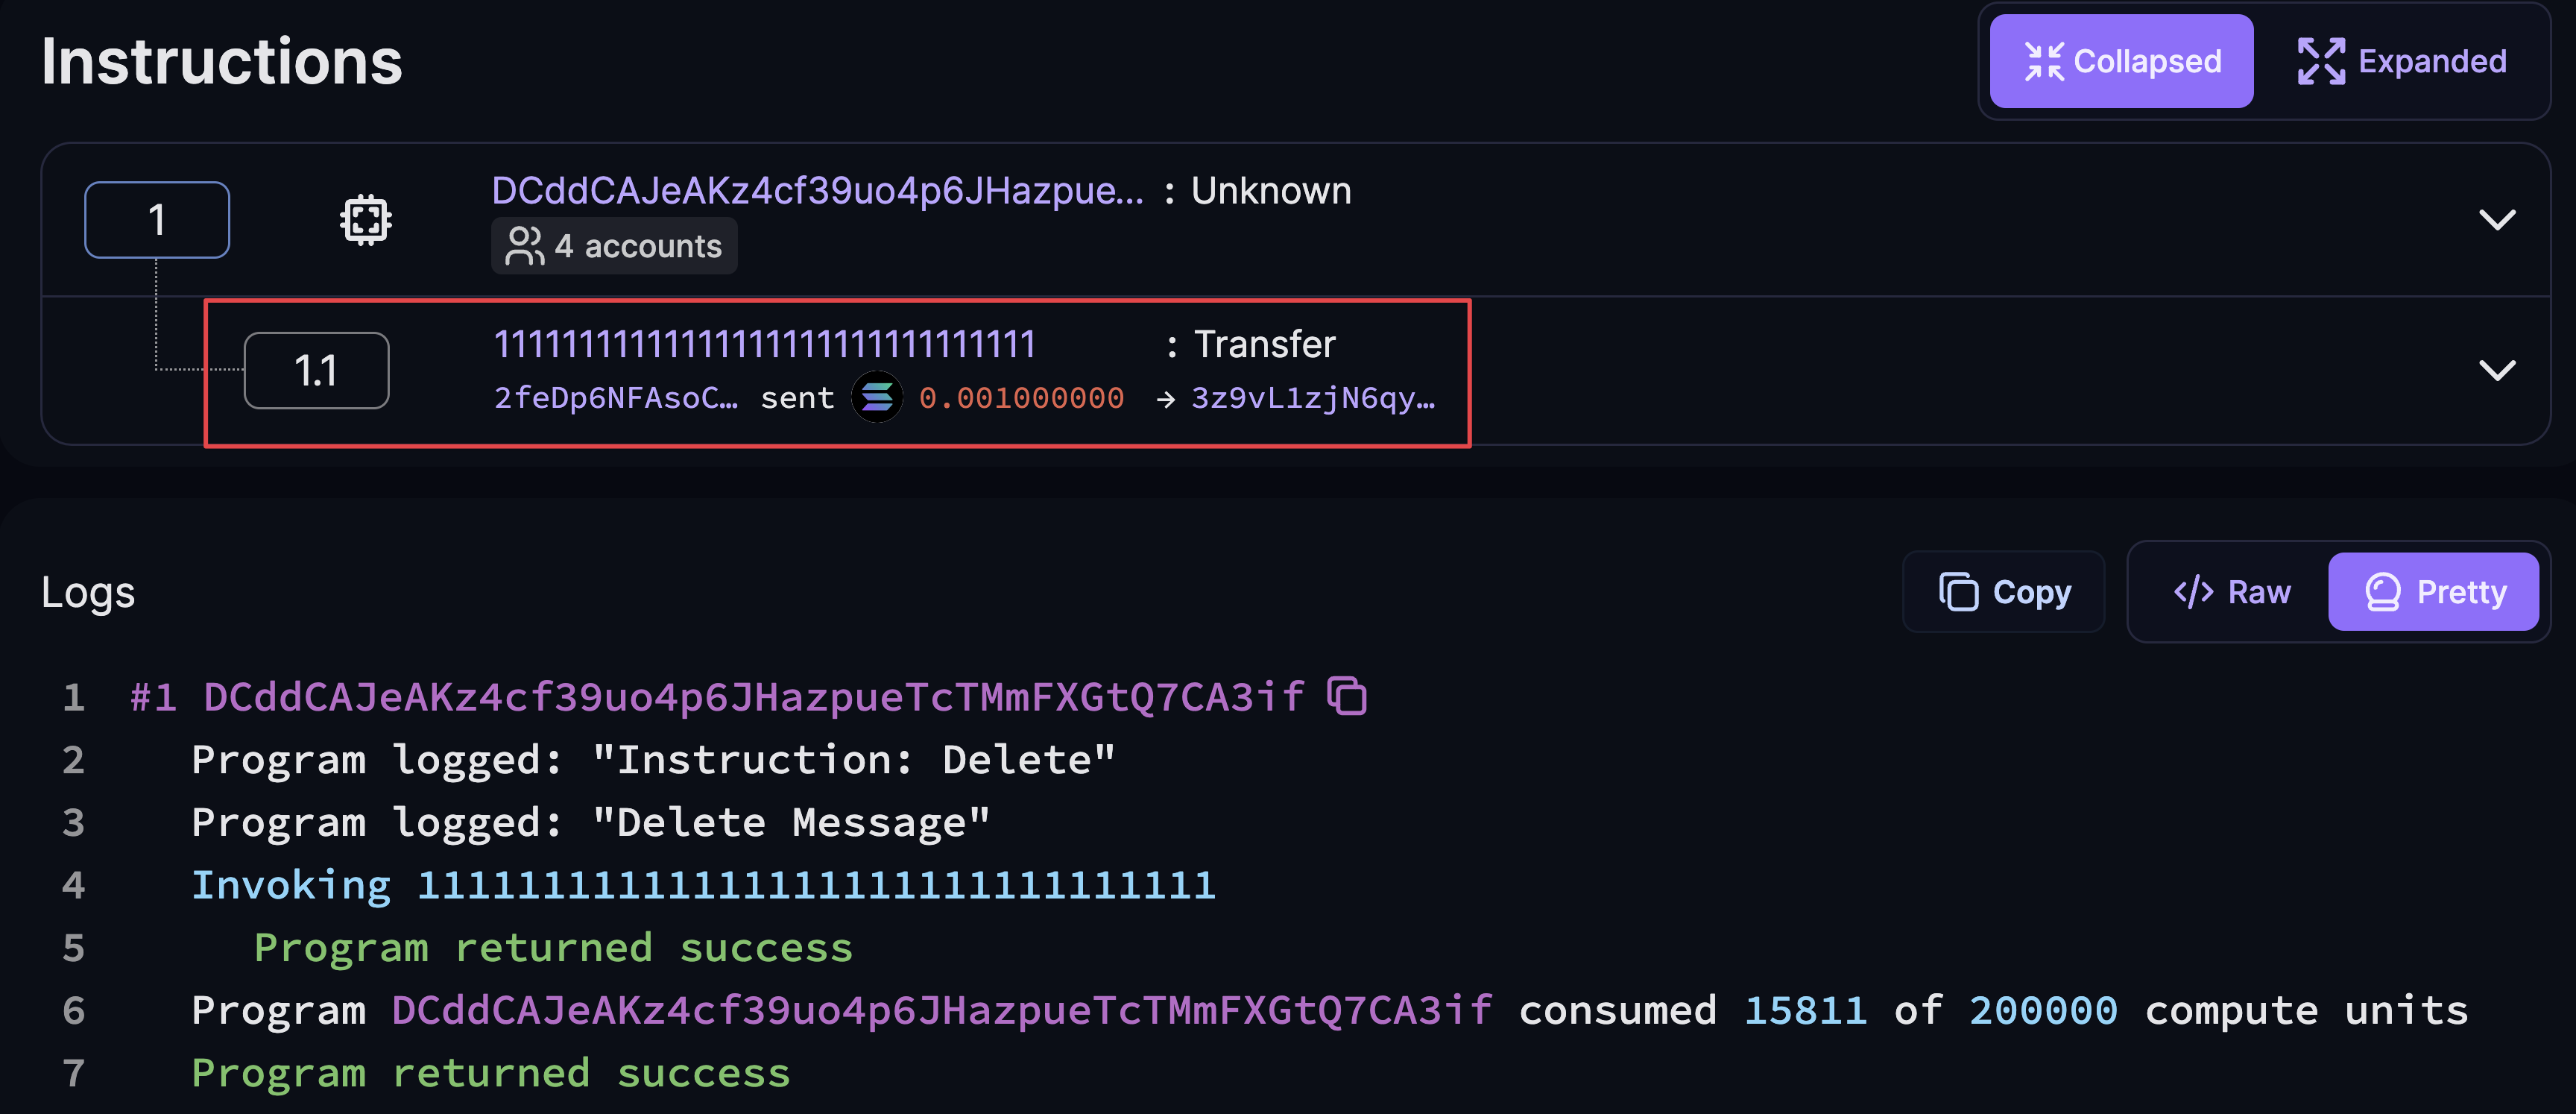 Delete CPI
If you encounter any errors, you can reference the final code.
Next Steps #
You've completed the Solana Quickstart guide! You've learned about accounts, transactions, PDAs, CPIs, and deployed your own programs.
Visit the Core Concepts pages for more comprehensive explanations of the topics covered in this guide.
Additional learning resources can be found on the Developer Resources page.
Explore More Examples #
If you prefer learning by example, check out the Program Examples Repository for a variety of example programs.
Solana Playground offers a convenient feature allowing you to import or view projects using their GitHub links. For example, open this Solana Playground link to view the Anchor project from this Github repo.
Click the Import button and enter a project name to add it to your list of
projects in Solana Playground. Once a project is imported, all changes are
automatically saved and persisted within the Playground environment.